This is a short version inspired from the course offered by Boot.dev. If you want a more interactive , hand holding pathway towards git i would 100% recommend their coursework named as Learn Git. Do check that out if you have never heard about them, they are really good. I can tell because i have tried their many courses personally. Not a paid promotion btw.
Basics:
We will be covering some basic things about git first then deep dive into some git internals(Internals part is not covered in boot.dev’s curriculum in depth). That i will be sharing separately as a single blog in my website in future. Now we will only learn the basics here and some basic internal working mechanisms.
Porcelain and plumbing:
- In git, commands are divided into high level commands → aka Porcelain, and low level commands → aka plumbing.
- We will mostly use Porcelain commands to interact with either any of our codebases.
- Some of the Porcelain commands are:
git statusgit addgit initgit commitgit pushgit pullgit log
- Some of the plumbing commands are:
git applygit commit-treegit hash-object
Git config:
Make sure you have git installed, there are numerous tutorials available plus you can simply refer to the official docs for the installation part as per your OS. Then open terminal and run git version , you should have a version that is >2.46.0 , if not please upgrade before proceeding.
What’s the need of configuring git before hand?
- First of all
gitcomes with 3 configuration files → global, local , system. Now they both contain certain information about ourselves that who we are. Whenever code changes, git can track who made the changes using that configuration file. - Also to ensure that we get proper credit for our own written code(Blame in git’s words), we need to set our
nameandemailinto the config files.
Most of the times we will be using global config. The difference between these files is that as the name says local config is the configurations for project level changes, it is stored inside individual projects(Having the top most priority → overrides every other configs). Global config is used only if something is missing inside local config. The system config is a machine wide fallback, we can ignore this for now. we will be seeing mostly the global config next.
- Let’s start with our configuration of setting up our identity inside git:
- Open terminal , then check if
user.nameanduser.emailare already set using the following command:git --no-pager config get user.name # For username git --no-pager config get user.email # For emailIf not set use the following commands to set them up:
git config set --global user.name "github_username_here" git config set --global user.email "email@example.com" # we can change the config using the same commands with updated details.- Instead of
githubusername you can use your own name too, whatever you prefer.
- Instead of
- Setting our default branch to work on → we will set
mainas our default branch, but you can initially set it up asmaster. For context: Git historically initialized repositories withmaster; GitHub commonly usesmain, and you can choose either name.git config set --global init.defaultbranch main # for main git config set --global init.defaultbranch master # for master - Verify the setup:
cat ~/.gitconfig
# or use this
git config list --local # for local config
git config list --global # for global config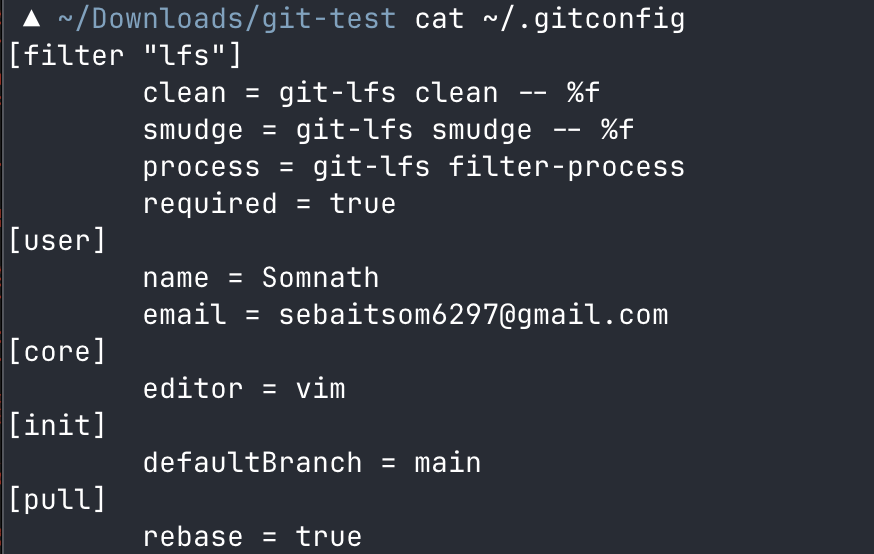
- If you don’t want to see all the values, we can filter that using the
getcommand:git config get <KEY> git config get user.name - If we need to unset any configuration value, we can use the
unsetcommand:git config unset <KEY> - If there are multiple values of a single key like for
user.nameyou have set 3 different values, then we can purge all of them in one go:git config unset --all <KEY> - If you want to remove an entire section from your configuration:
git config remove-section <SECTION>
- Open terminal , then check if
Git configuration locations:
- System:
/etc/gitconfig→ a file that configures Git for all users on the system. - Global:
~/.gitconfig, a file that configures Git for all projects of a user. - Local:
.git/config, a file that configures Git for a specific project. - worktree:
.git/config.worktree, a file that configures Git for part of a project.
Git configuration overriding:
- If you set a configuration in a more specific location, it will override the same configuration in a more general location. For example, if you set
user.namein the local configuration, it will override theuser.nameset in the global configuration.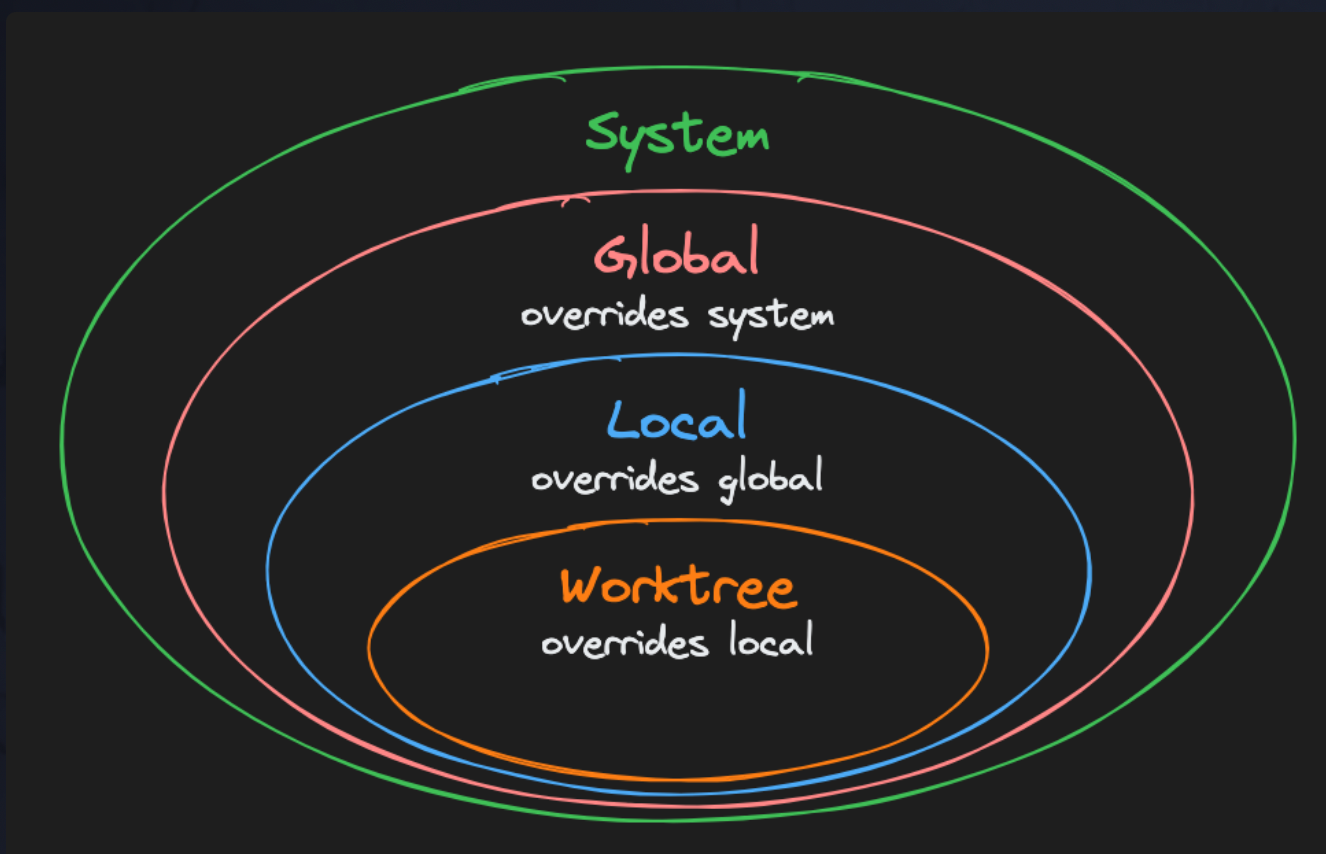
Setting up repo:
- The very first step of any project is to create a repository. A Git “repository” (or “repo”) represents a single project.
- A repo is just a directory that holds all of the files and folders of our project. It contains a hidden
.gitdirectory which holds internal tracking and versioning information of our project. - So to setup the repo , first create a directory/folder in your favourable location:
mkdir first-repo cd first-repo - Now after moving into the directory, initialise
git:git init - After the initialization, you will have a hidden
.gitdirectory. That you can check using the following command:ls -a # -> - a flag shows all the hidden files on our current directory
Status:
- A file can be in many different states inside a git repository. The most important states are:
Untracked: Not being tracked by git.staged: Marked for inclusion in the next commit.committed: Saved to the repository’s history.
- Now how we will see the state of our repo? To see that we can use the following command:
git status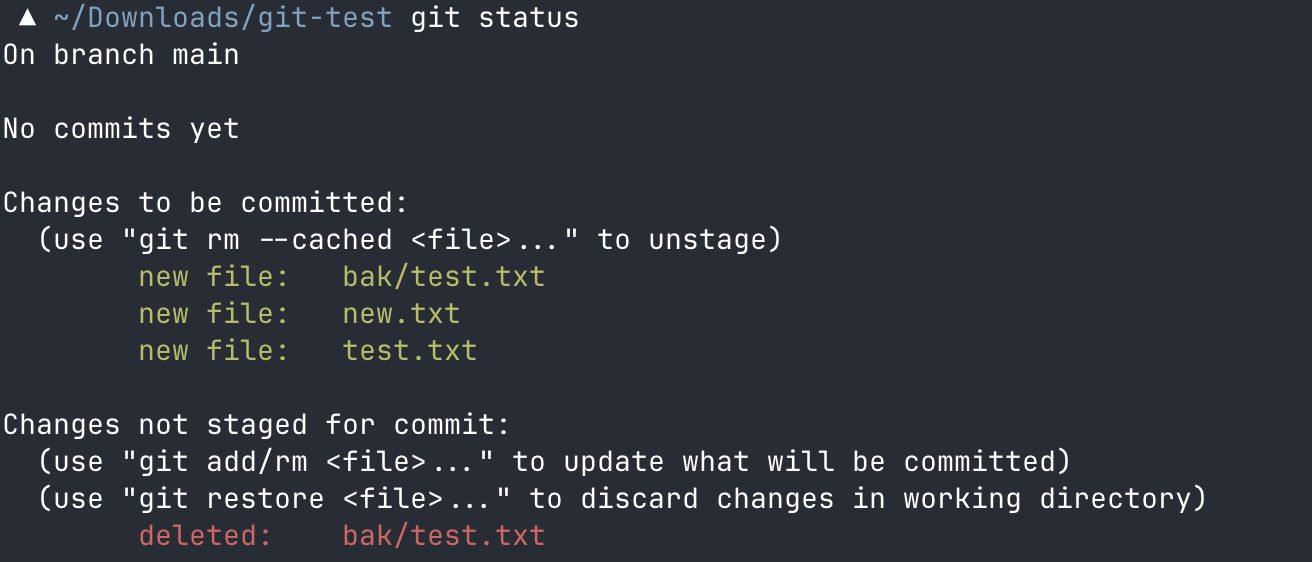
In your case, the results may differ because you are starting with a new repo. Ignore the results , don’t let those intimidate you. Yours repo should show nothing for now.
- To see changes, create a dummy file and name it let’s say
README.md:touch README.md # Then again check the status git status- This time it should show an untracked file named as
README.mdinside the state of your git repo.
- This time it should show an untracked file named as
Staging:
- To add the
untrackedfile into our repoindex, we can use the following command:git add README.md # we can provide a relative path of a file too, rather than a file name git add git-test/i-use-arch-btw/README.md- Without staging, no files are included in the commit – only the files you explicitly git add will be committed.
Commit:
- A
commitis a snapshot of the repository at a given point in time. It’s a way to save the state of the repository, and it’s how Git keeps track of changes to the project. A commit comes with a message that describes the changes made in the commit. - Here’s how we can made a
commit:git commit -m "YOUR_MESSAGE_ABOUT_THE_CHANGES_YOU_ARE_COMMITTING"
We can change our last commit(if we screwed up of course) using the following command : git commit --amend -m "YOUR_NEW_UNSCREWED_MESSAGE"
Git log:
- A Git repo is a (potentially very long) list of commits, where each commit represents the full state of the repository at a given point in time.
- The
git logcommand shows the history of the commits done by you in a repo. Via the logs we can see that → who made the commit, when the commit was made, what was changed. - Each commit has a unique identifier called a “commit hash” like this
343cdc6121cc032a31004e61f745307b7acbad26. For convenience, you can refer to any commit or change within Git by using the firstsevencharacters of its hash. For mine, that’s343cdc6. To note seven characters are conventional, but Git may require more when that prefix is ambiguous. - To check the logs you can use the following command:
git --no-pager log -n 10--no-pager: This will paste the logs onto your current static terminal window only, rather than opening something interactive window likeless/more-n: It limits the number of commits shown in the output.
- Other useful flags:
git log --decorate=full # by default git log --decorate=short git log --decorate=no git log --oneline # more compact view of the output git log --oneline --graph --all # shows a nice ASCII art with parent hashes of commit hashes - Also
gitstores all of your commits locally as objects inside.git/objects. A commit is just an object. Which we can see using the following command:find .git/objects -type f
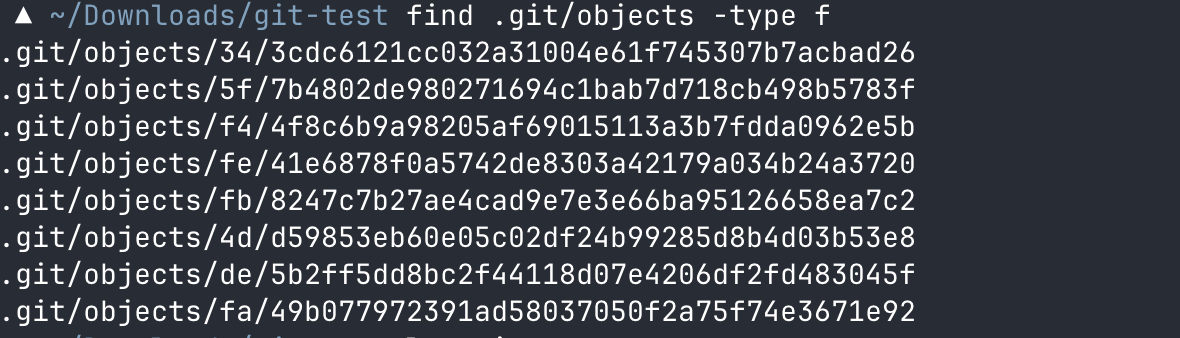
- If you want to see the contents of a particular commit you can see that using this command:
ls -al .git/objects/<first-two-hex>/<remaining-hex> ls -al .git/objects/a8/7a5e851ac246528fa29156528afa4838e7bcec - You should see Compressed RAW bytes. We can convert it into a hexdump so that we can understand the contents of the file in a hexadecimal format(LARPING). For that we will be using a tool named as
xxd/:xxd .git/objects/a8/7a5e851ac246528fa29156528afa4838e7bcec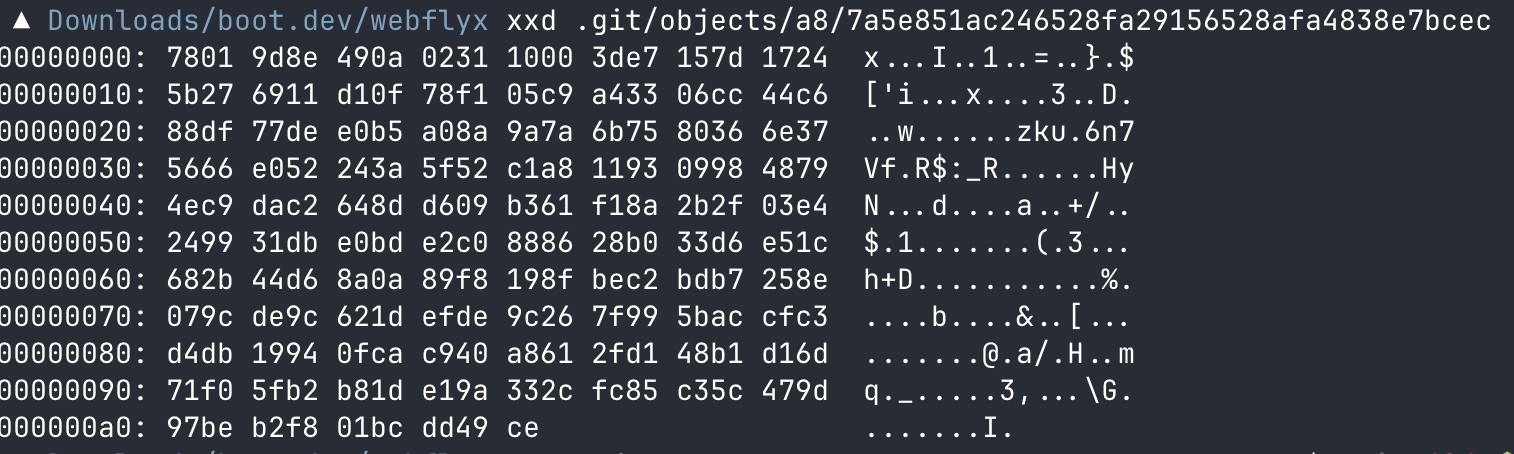
Git internals(It won’t be that deep):
Commit-hash:
- My latest commit hash is this
a87a5e851ac246528fa29156528afa4838e7bcec. You may notice even though we put same content inside the same named file, the commit hash will be different for both of us. The reason behind this is that even though thecommit hashesare being derived from the content changes of the file , there’s some additional stuff that affects the end hash like:- The commit message
- The author’s name and email
- The date and time
- Parent(previous) commit hashes
- Git uses a cryptographic hash function called
SHA-1to generate the commit hashes.
cat-file:
- Git has a buil-in
plumbingcommand called ascat-file, that allows us to see the contents of a commit hash without needing to LARP around with the object files directly:git cat-file -p <COMMIT-HASH> git cat-file -p a87a5e851ac246528fa29156528afa4838e7bcec
-p: It pretty prints the output.
Trees and Blobs:
Tree: The way git uses to store directory.
Blobs: The way git uses to store files.
- If we see our
git cat-fileoutput on the previous section:
- We can see certain details like:
treeobject along with it’s hash.- The
author - The
committer - The commit message.
- We can see certain details like:
- Still we can’t see the contents of our file which we committed. Because it’s stored inside a
bloband the blob is stored inside thetree. - To see the contents follow the steps:
- Copy the
treeobject’s hash and use it withgit cat-file:git cat-file -p <TREE-HASH>
- Now don’t get overwhelmed if you don’t have a lot of blobs, you may have one or more than mine. Choose the hash of the
blobyou want to see the content of and use it again withgit cat-file:git cat-file <BLOB-HASH>
- Copy the
Data storage:
- Git stores an entire snapshot of files on a per-commit level.
- OPTIMIZATION:
- To optimize the storing of data , git compresses and packs files.
- Git deduplicates files that are the same across different commits. If a file doesn’t change between commits, Git will only store it once.
Git branching:
Git branchallows us to keep track of different changes separately.- Let’s say we have a big project where we are making a game and we need to add a new feature like
shooting the enemy. So instead of changing the whole project entirely, we can create a new branch out of themainbranch/masterbranch called asshooting_mechanism. Then when we are done making the feature we can simply merge that branch into themainbranch to keep the changes. In case if you don’t like the changes , you can simply remove theshooting_mechanismbranch and go back to themainbranch. - BRANCH UNDER THE HOOD:
- A branch is just a named pointer to a specific commit.
- When you create a branch, you are creating a new pointer to a specific commit. The commit that the branch points to is called the tip of the branch.
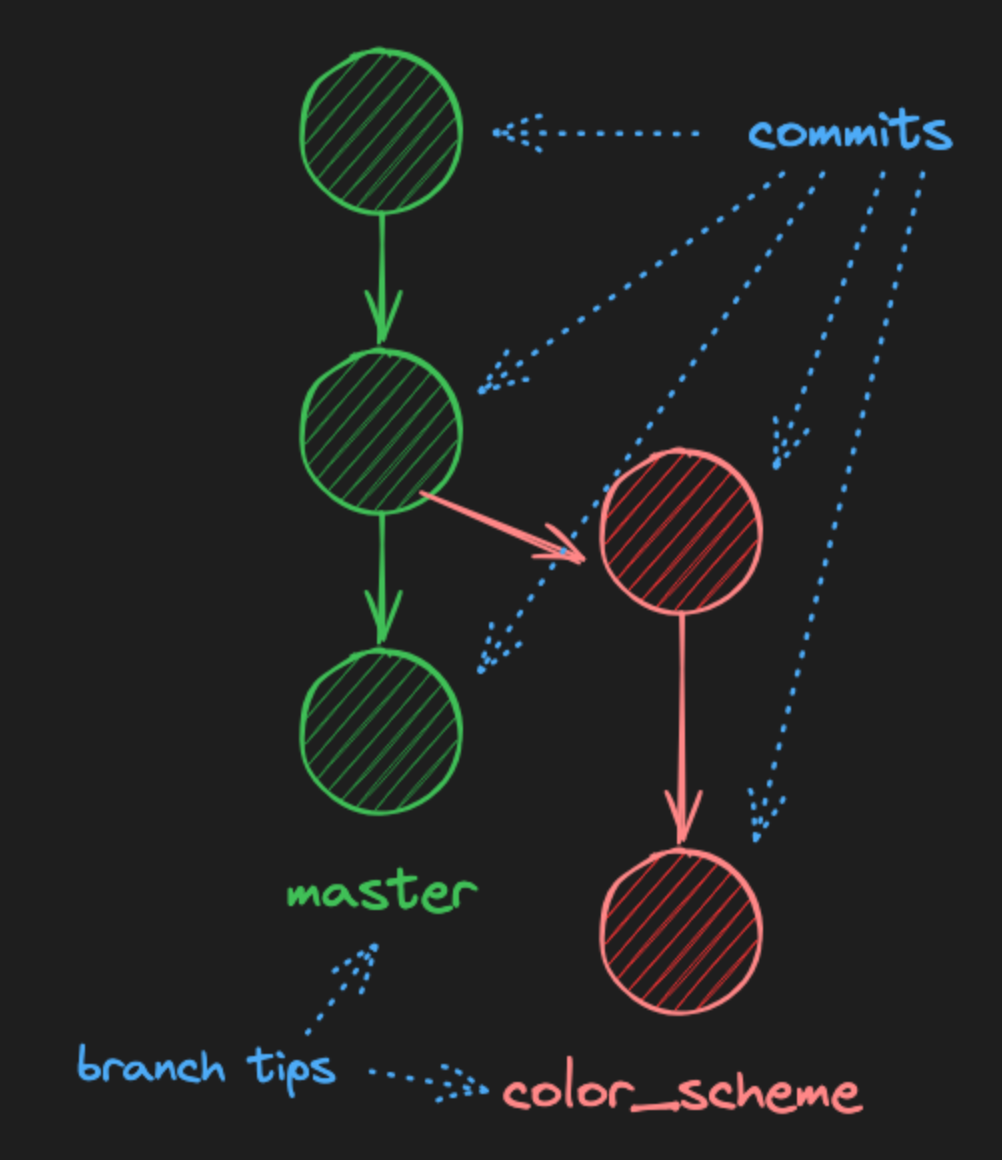
CREDIT: Boot.dev - Because a branch is nothing but a pointer to a commit, they are extremely lightweight and cheap resource-wise to create.
- To check your
branchuse the following command:git branch
Renaming a branch:
git branch -m <old-name> <new-name>
git branch -m master main
Creating a branch:
- There are 2 ways to create a branch:
- First:
git branch <NEW_BRANCH_NAME> - Second:
git -c switch <NEW-BRANCH-NAME>- The
switchcommand allows us to switch branches. Including the-cflag tells Git to create a new branch and switch to it.
- The
- First:
- If we want to create a branch off of some other commit, other than the latest one, say for example there are 3 commits in
mainbranch →A, B, C, i want to create a branch fromBwe can use the following command:git -c switch <new_branch_name> <COMMIT_HASH_OF_B_COMMIT>- You can get the
COMMIT_HASHof any commit using thegit log --onelinecommand. Check from where you want to create a branch accordingly.
- You can get the
- When you create a new branch, it uses the current commit you are on as the branch base.
- Let’s say we are having a main branch of 3 commits → Commit
A, B, C. Then we are creating a new branch named asnew_branch. AsCis the last commit ofmain branch, thenew_branchwill be a pointer to thatCcommit, when we will rungit switch -c new_branch.The visualization will look like this: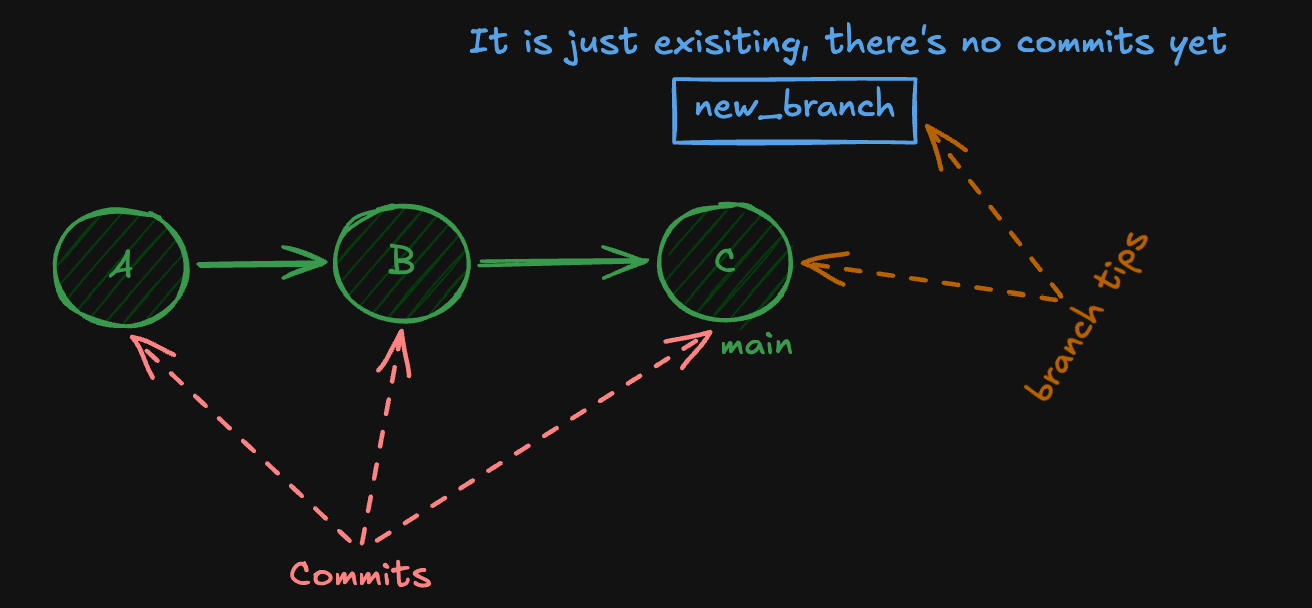
We can switch to an another branch using git switch and there’s another old command which is being used by many devs that is git checkout. Syntax of the command is git checkout <new-branch-name>. It is advised to use git switch because why not it’s kind of better and having a well put name for switching branches.
- When we will make a commits over to our
new_branch, let’s say we did one commitD. Then the branch will look something like this: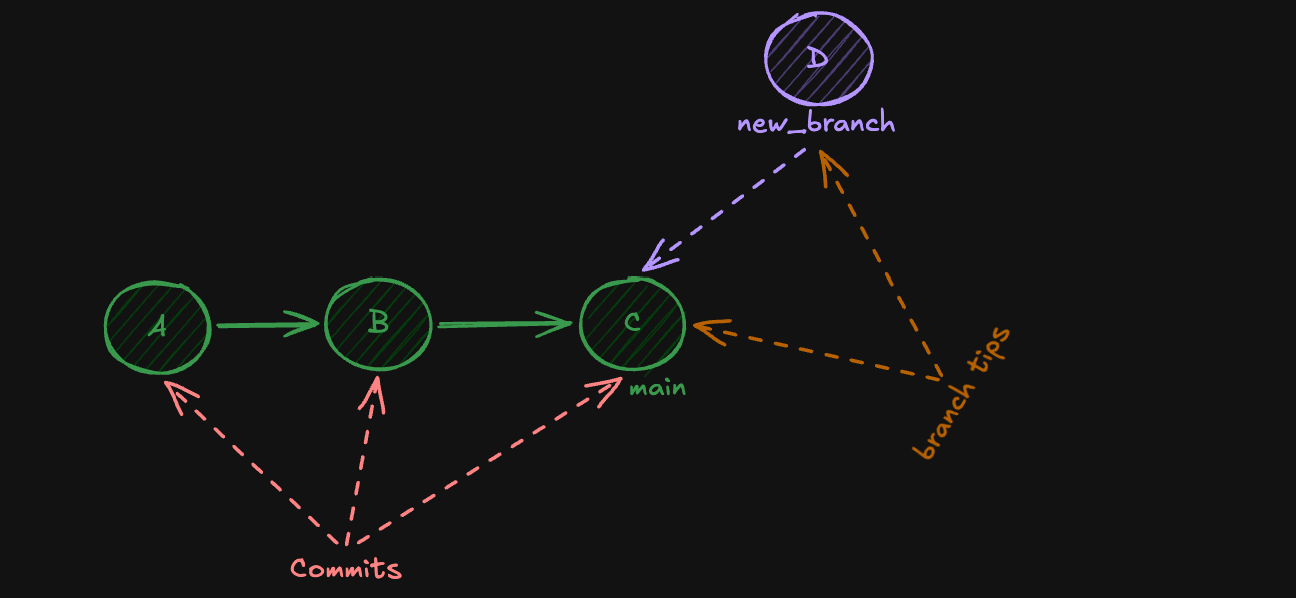
Git files:
- As we know git stores all of the information in files inside
.gitsubdirectory at the root of our project, even information about branches. - The “heads” (or “tips”) of branches are stored in the
.git/refs/headsdirectory. It contains one file for each branch and the branch files are containing their respectivecommit hashthat the branch points to. - Seeing the
commit hashof the branch tips, let’ see ourmainbranch:cat .git/refs/heads/main # if you have branches you can see those hashes too.
- After getting the commit hash we can see the properties of that hash using
git cat-fileas well as we can find it’s object location inside.gitdirectory:# Dinding the hash object location find .git -name "a8" # See the hash object: ls .git/objects/a8/ git cat-file -p <HASH_VALUE>

Git merge:
- Let’s say we are in this stage where we are having 2 branches →
mainwith 3 commits andnew_branchwith 2 commits: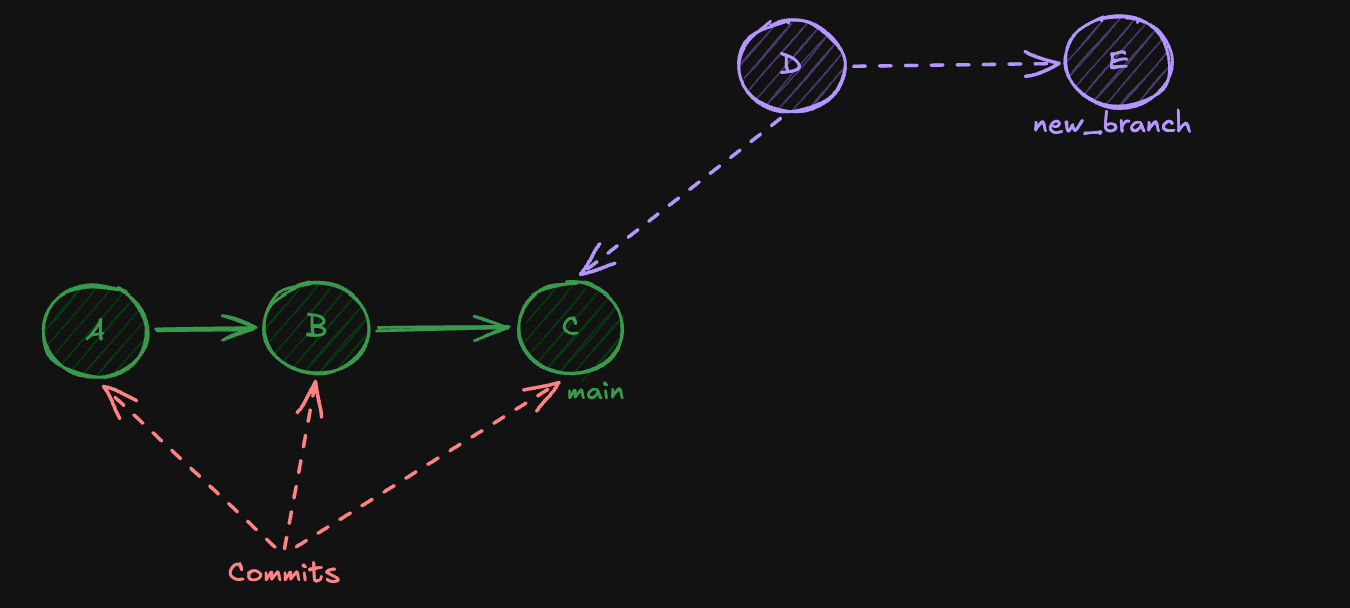
- If neither branch tip is an ancestor of the other, merging
new_branchintomaincreates a merge commit with both histories as parents: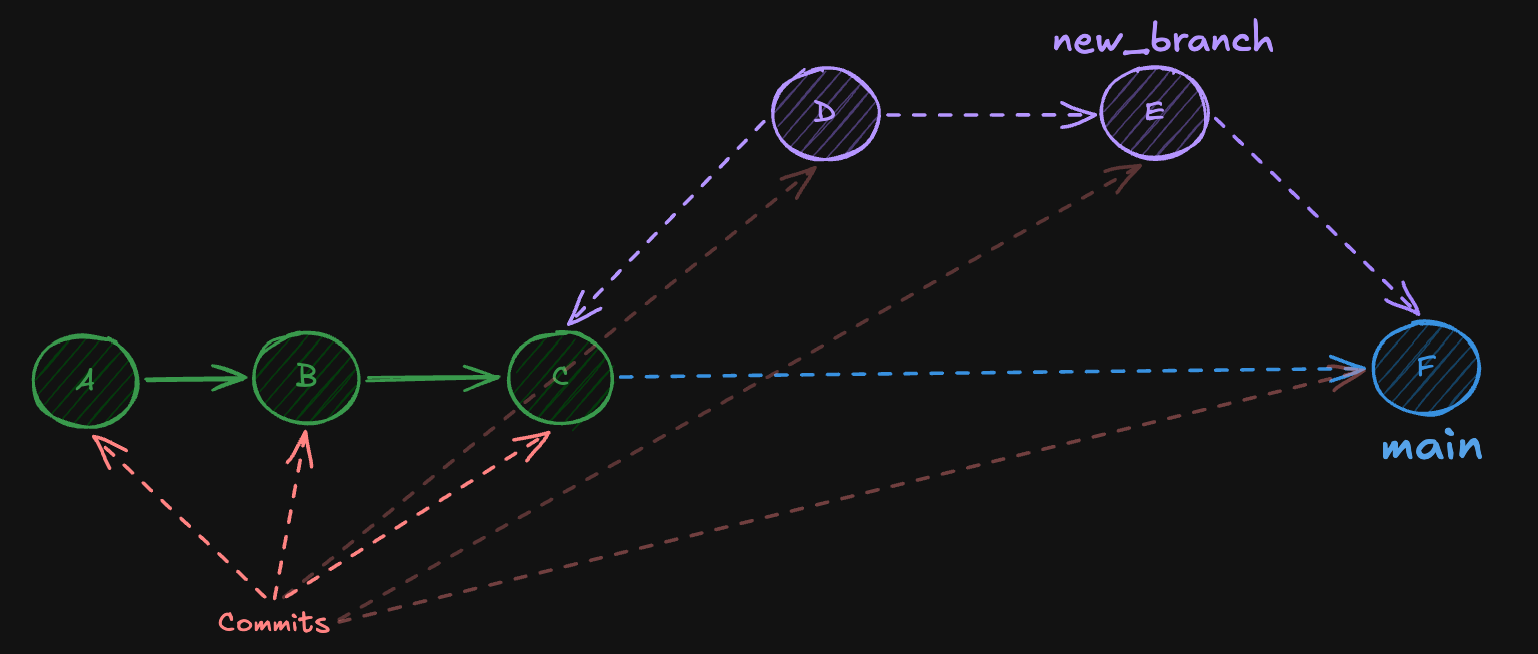
- Here
Fis a merge commit that has bothCandEas parents.Fbrings all the changes fromDandEback into themainbranch. Command used to merge onto main:git switch main # switching to main git merge new_branch - When we run this command these are the following things that happen under the hood:
- Find the “merge base” commit, or “best common ancestor” of the two branches. In this case,
B. - Replay the changes from
main, starting from the best common ancestor, into a new commit. - Replay the changes from
new_branchontomain, starting from the best common ancestor. - Records the result as a new commit, in our case,
F. Fis special because it has two parents,CandE. Means it points towards both of those commits.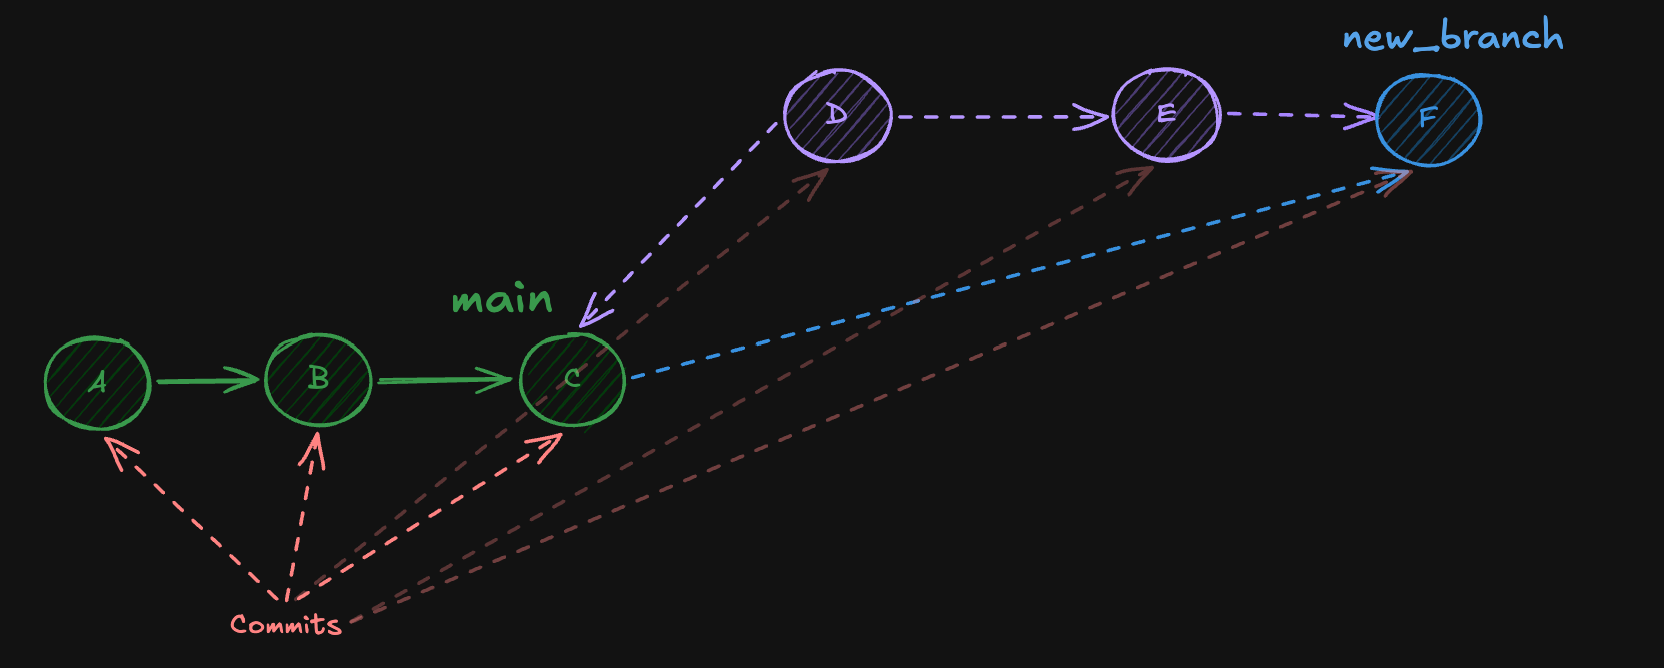
- Find the “merge base” commit, or “best common ancestor” of the two branches. In this case,
- When we will be merging the branch we can merge from the
mainor vice-versa using the following command:git switch main git merge new_branch # merging new_branch from main branch - Let’s see a bit complex setup:
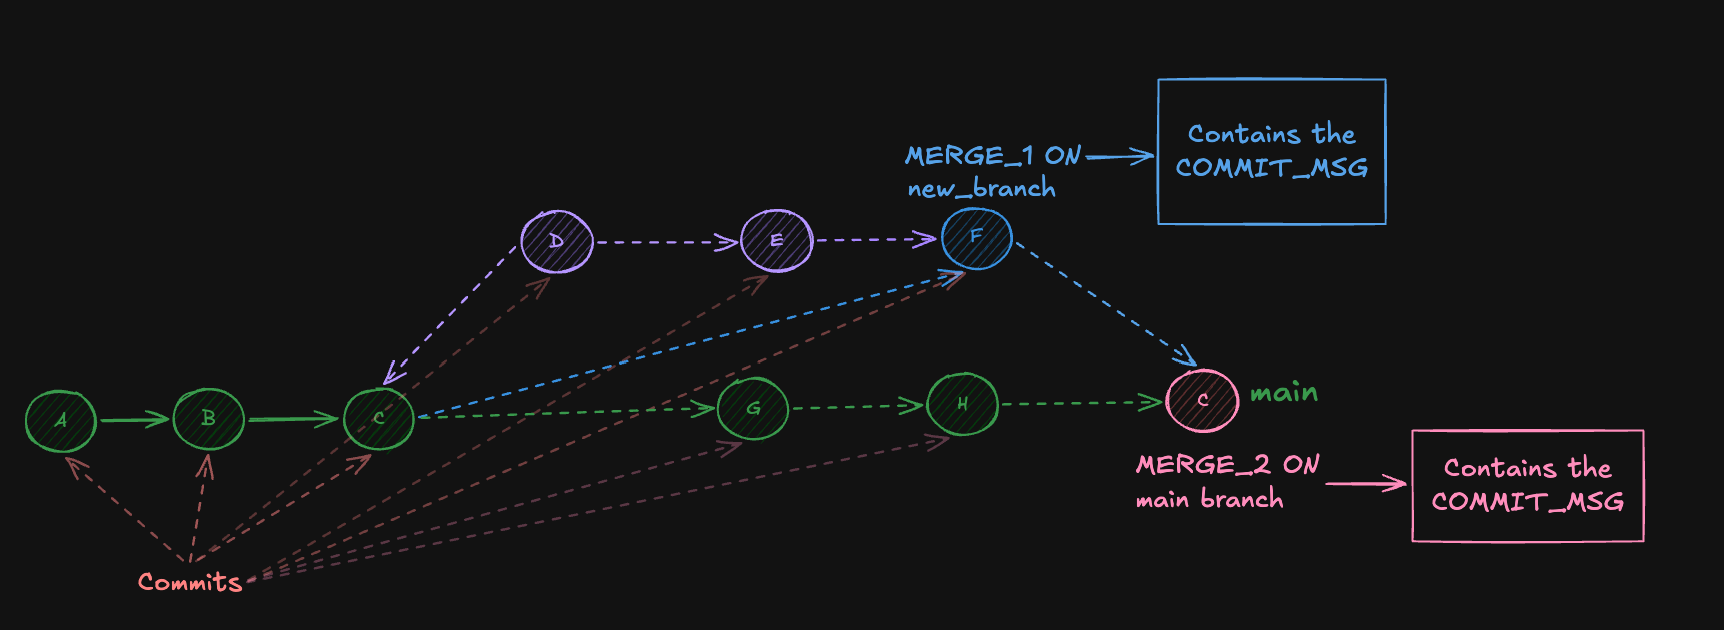
- In the above diagram we can see we have already merged once from
new_branch, after thatmainbranch created 2 more new commits. Then i decided that i want to merge mynew_branchonto themainbranch. It resulted 2 new commit objects with their respectiveCOMMIT_MSG. We merged using the following command from main:# previously we were on new_branch git switch main # made 2 new commits git merge new_branch # merged new_branch from main
Tips: if you mess up the commit message and want to change it:
- We can change the
commit messageif we have messed it up using the--amendoption:git commit --amend -m "F: Merge branch 'new_branch'"
If you don’t prefer vim as your default editor for writing messages, you can do that using the following commands:
If you want to set VS code as the default editor: git config --global core.editor "code --wait
If you want to set zed as your default editor: git config --global core.editor "zed --wait"
Fast-forward merge:
- This is the simplest type of merge.
- Let’ say we are having this:
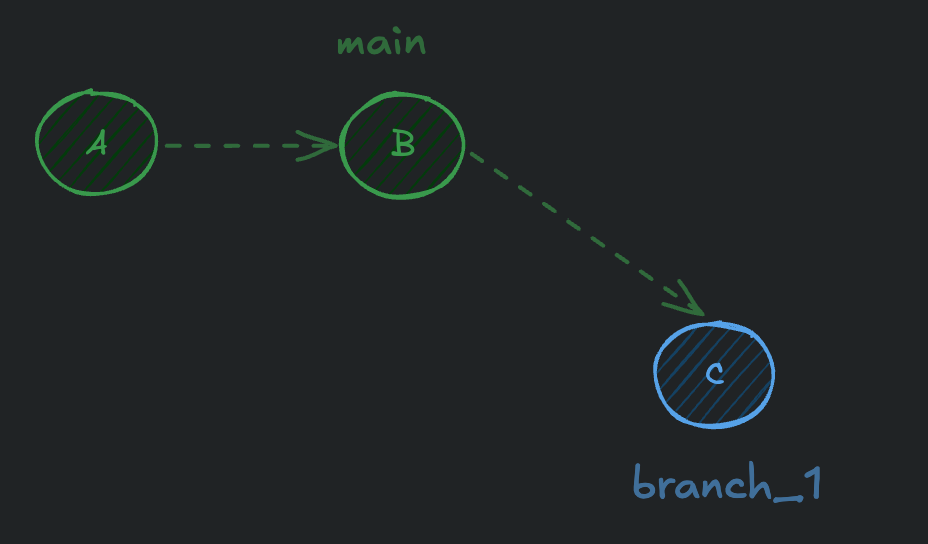
- Now if we merge from
mainusing the command:git merge branch_1- Just because
branch_1is containing all the commits thatmainbranch has, git automatically does a fast-forward merge. It just moves the pointer of the “base” branch to the tip of the “branch_1” branch like this: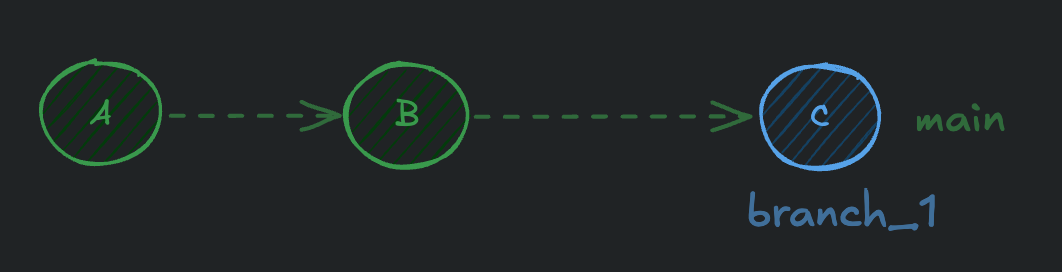
- In
fast forward merge, no merge commit is created. On the above scenario theheadpointer is pointing tomainafter merging.
- Just because
- Now if we merge from
The head will always point to that branch from which i will be merging.
- Another common point of confusion is that let’s say what will happen if the branch we are working on is having multiple commits and what will happen if
mainbranch moves forward with multiple commits, let’s see both the scenarios:- When branch_1 will have multiple commits, and main branch is behind with not further commits:
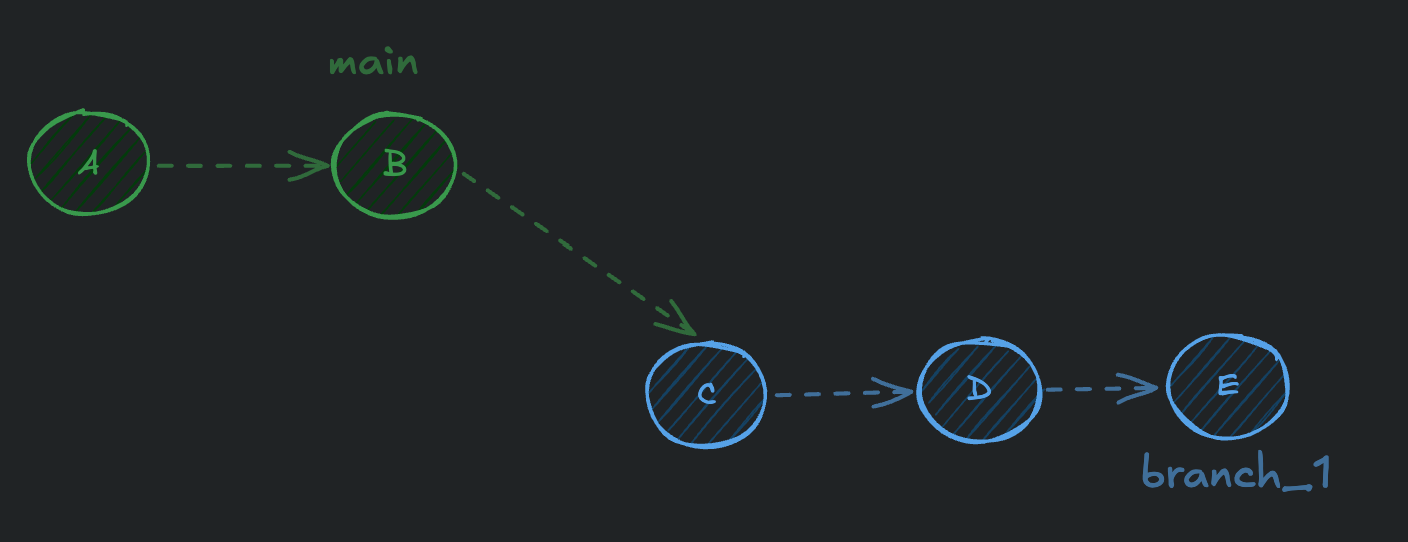
- Now if i merge the
branch_1frommain, it will perform a fast forward merge still. Reason being in the perspective ofmainthebranch_1is already having the commits thatmainbranch has. Here also git will move the pointer of the base branch which ismainto the tip ofbranch_1: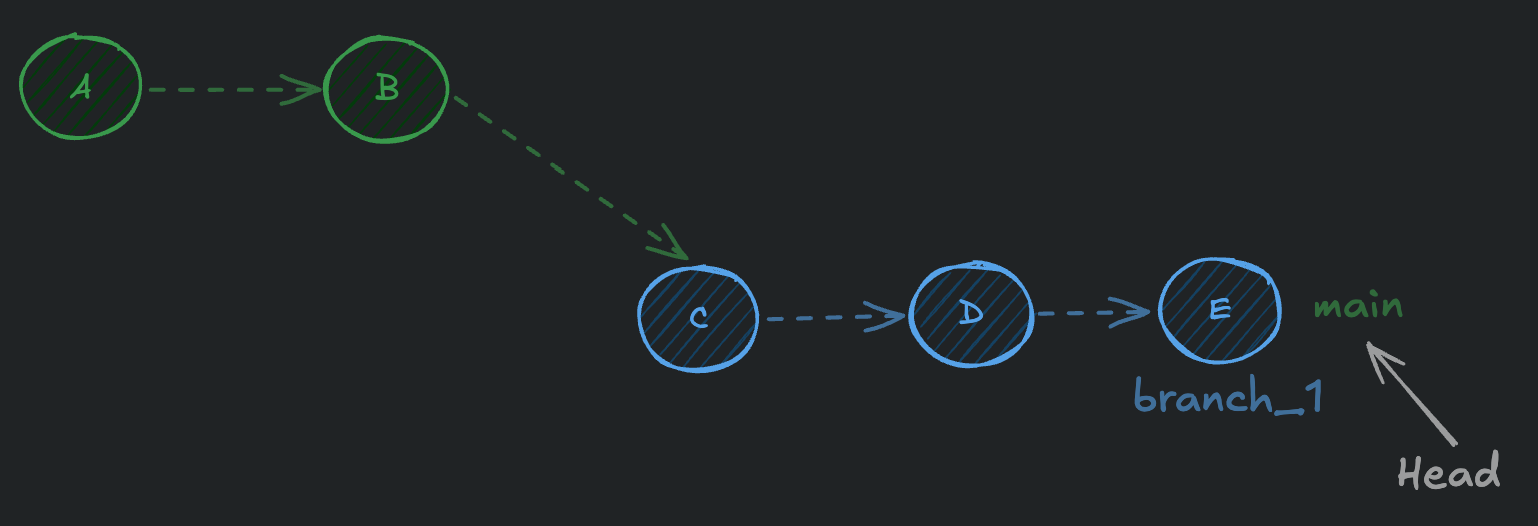
- Now if i merge the
- When main branch will have commits along with the branch_1:
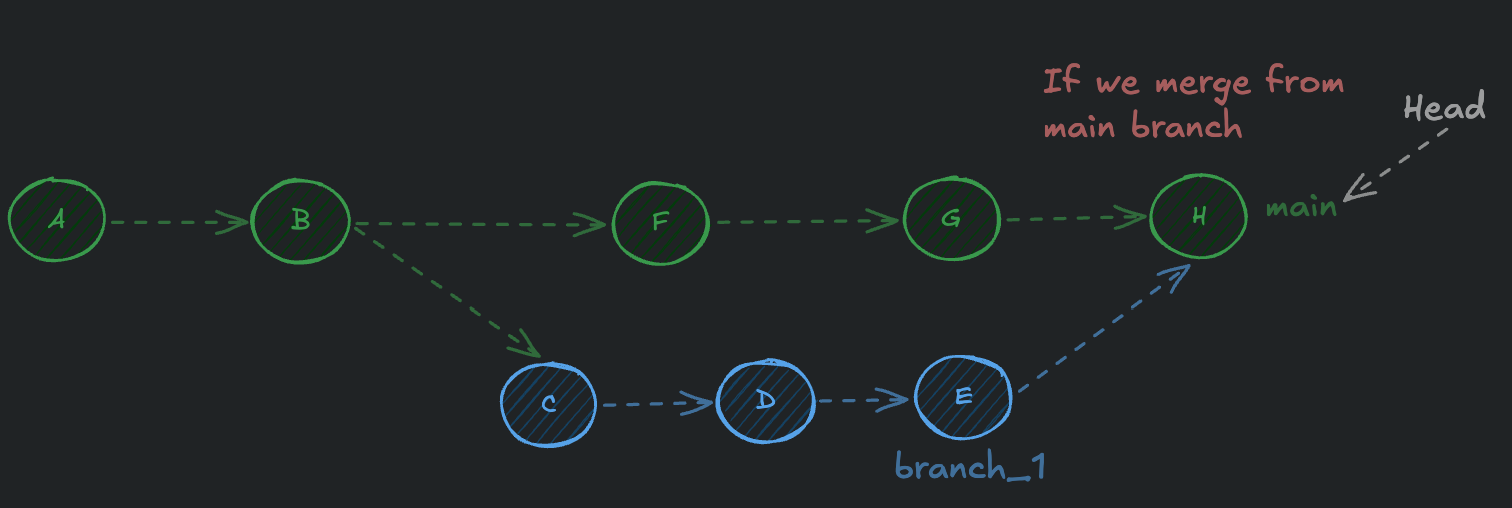
- It won’t be a fast forward merge, because now our
branch_1doesn’t know about the commitF, G, H, means it doesn’t have all themainbranch’s commits.
- It won’t be a fast forward merge, because now our
- When branch_1 will have multiple commits, and main branch is behind with not further commits:
Always keep your main branch behind of your other branches if you want to do a fast forward merge.
Common developer workflow for merging:
- Create a branch for a new change
- Make the change
- Merge the branch back into
main(or whatever branch your team dubs the “default” branch) - Remove the branch
- Repeat
Git rebase:
- When we rebase it doesn’t create any merge commits. It simply replays the commits from another branch on top of main. Let’s take a scenario:
- Let’s say we are having 4 commits in our
mainbranch, and we have created a branch off of the 2nd commit frommainbranch. That branch is also having 2 commits like this: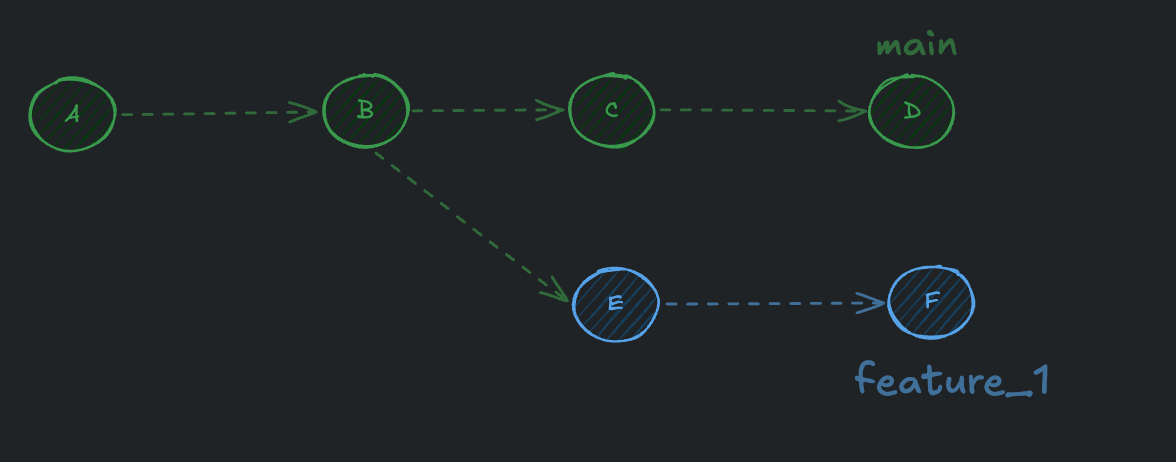
- We are on the
feature_1branch. To bring changes frommainonto the current branchfeature_1, we will use this command:This will do the following:git rebase main- Identify the latest commit from
mainand use it as the temporary new base for the rebase process - Replay each commit from
feature_1one at a time onto this temporary location - Update the
feature_1branch to point to the last replayed commit in the temporary location, making this the new permanentfeature_1 - The rebase does not affect the
mainbranch;feature-1now includes all changes frommain.
- Identify the latest commit from
- The current branch will look like this after rebase:
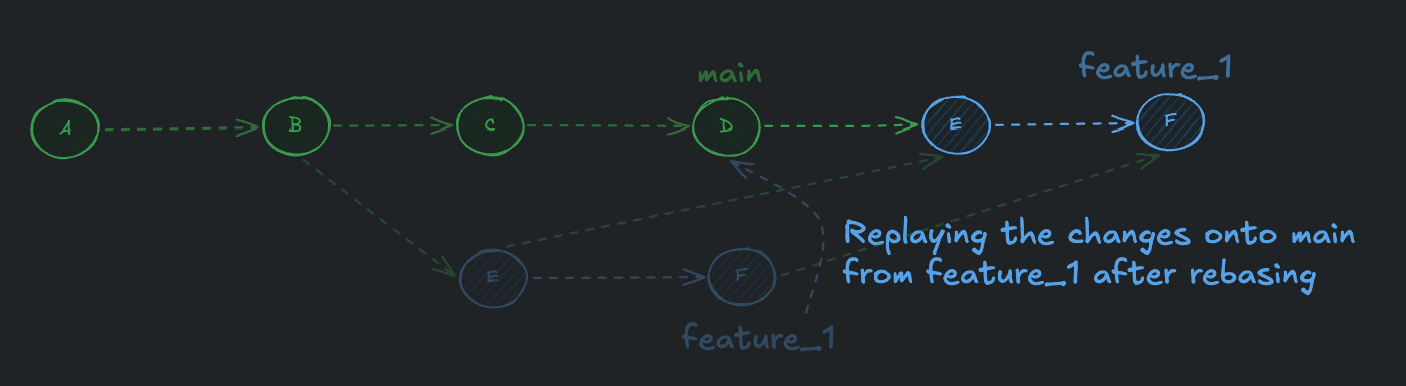
- We can see there’s no additional
commitis being made during rebase. Also we will be having a linear history if we do agit log --onelineto check.
- Let’s say we are having 4 commits in our
When to use Merge and when to use rebase?
An advantage of merge is that it preserves the true history of the project. It shows when branches were merged and where. One disadvantage is that it can create a lot of merge commits, which can make the history harder to read and understand.
A linear history is generally easier to read, understand, and work with. Some teams enforce the usage of one or the other on their main branch, but generally speaking, you’ll be able to do whatever you want with your own branches.
You should never rebase a public branch (like main) onto anything else. Other developers have it checked out, and if you change its history, you’ll cause a lot of problems for them.
However, with your own branch, you can rebase onto other branches (including a public branch like main) as much as you want.
Resetting changes:
Soft reset:
- Moves the current branch and, depending on its mode, may reset the index and working tree.
--softmoves only the branch pointer:git reset --soft COMMIT_HASH- The
--softoption is useful if you just want to go back to a previous commit, but keep all of your changes. - Committed changes will be uncommitted and staged, while uncommitted changes will remain staged or unstaged as before.
- The
Hard reset:
- In the case of
soft commitwe kinda time traveled to the previous commit by preserving our current commits. But in the case ofhard commitit’s not going to keep the changes:git reset --hard COMMIT_HASH- The
--hardflag makes your working directory and staging area match the specified commit exactly, discarding any local changes. - This is useful if you just want to go back to a previous commit and discard all the changes.
- The
Always be careful when you are using --hard reset. If you were to simply delete a committed file, it would be trivially easy to recover because it is tracked in Git. However, if you used git reset --hard to undo committing that file, it would be deleted for good.
Git remote:
- We can have “remotes,” which are just external repos with mostly the same Git history as our local repo.
Gitis just the CLI tool, there’s isn’t a central repo . Github is just someone else’s repo.- In git, another repo is called a “remote.” The standard convention is that when you’re treating the remote as the “authoritative source of truth” (such as GitHub) you would name it the “origin”.
- Syntax:
git remote add <name> <uri>
We can refer a local different repo as remote as well. Git will treat other git repos as remote .
Git fetch - for local repos:
- Adding a remote to our Git repo does not mean that we automagically have all the contents of the remote. First, we need to fetch the contents:
# Run this from the new repo you created, where you want to fetch other repo's contents git fetch origin - Fetching downloads the remote’s reachable commits and objects while updating remote-tracking branches, but it does not update your current branch or working tree. Use
git log origin/mainto inspect the fetched history, then merge, rebase, or switch as appropriate.
We can log the commits of a remote repo as well using git log <remote>/<branch> → git log origin/main
Merging branches between local and remote repo:
- For example: if i want to merge the
feature_1branch of the remoteorigininto our localmainbranch, i would run this inside the local repo:git merge origin/feature_1 - Because the local repo is currently empty and branch is also empty → means we are behind the remote branch. We will get to see a
fast forwardmerge instead of acommit merge.
.gitignore:
- Sometimes we don’t want to track some crucial files under
git, because we may put those on the internet unknowingly. To prevent that mistake, we can utilize the filegitoffers which is.gitignore. - For example, if you work with Python, you probably want to ignore automatically generated files like
.pycand__pycache__. If you are building a server, you probably want to ignore.envfiles that might hold private keys. If you (I’m sorry) work with JavaScript, you might want to ignore thenode_modulesdirectory. - Inside the
.gitignorefile we can add files like this to ignore them:node_modules .env
You can use regex patterns to match multiple files all at once . Be careful with them if you don’t know how to use regex, specify the specific file paths. But when you will be working with a lot of files and folders, learning a bit of regex doesn’t hurt.
What to ignore?
- Ignore things that can be generated (e.g. compiled code, minified files, etc.)
- Ignore dependencies (e.g.
node_modules,venv,packages, etc.) - Ignore things that are personal or specific to how you like to work (e.g. editor settings)
- Ignore things that are sensitive or dangerous (e.g.
.envfiles, passwords, API keys, etc.)
If you want a gamified learning of git or any backend related stuff, i would 100% recommend to check out the Boot.dev’s backend curriculum. Here’s the link -> Boot.dev